You may have noticed as I have that most articles about XML are designed to illustrate a particular point. To work on a project, you have to cobble together tons of information from a lot of different sources just to figure out what you need to do. In this article, I take a different approach. My goal with this article is to demonstrate how you can apply XML technology to an entire specific Web development project. As I’ve surfed the Web and paged through various tomes in search of answers to my questions, I’ve built a small library of techniques for solving common Internet development issues. Perhaps by sharing this hard-won knowledge, you can avoid some of that effort. (Click to download the code for this example.)
|
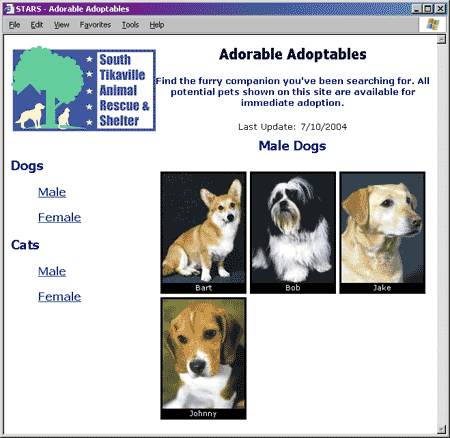
In this article, I show you how to transform XML data into an HTML table. If you always have a known quantity of elements in the source data and your data fits perfectly into a static table size, this project would be a fairly trivial exercise. The challenges in the task lie in the fact that the table must be configurable with a variable number of cells per row, and you don’t know exactly how much data you will have to render ahead of time. This article is targeted for intermediate transform developers and assumes you have a basic understanding of XML and XSL syntax. (If you’ve never written an XSL transform before, then what you are about to see may require some additional research on your part first, for you to fully understand how it works.) The STARS ProjectFirst, I want to show you the end product of this technology demonstration. The sample page shown in Figure 1 is a Web page for a fictitious pet rescue organization called the South Tikaville Animal Rescue and Shelter (STARS). The page contains information about pets available for adoption. Each cell contains a photo and pet name. Links on the left side select the different animal species and gender display options. Because I expect to alter the layout of the page that contains the table, I want to be easily able to change the number of cells in each row and the standardized photo size. Also, I want to use the same transform for all my XML files, which means I have to accommodate a variable number of cells in the table. I’ll show you how I deal with these issues as I explain the transform.
Figure 1: The STARS Pet List Page In a real business Web application, you would create a Web page that extracts the appropriate data from a database (probably based on query string parameters), assembles an XML document, and writes it to the browser through an XSL transform. Since this article focuses strictly on the transform, I’ll simulate the data-driven aspect by creating four separate XML files that reference the same transform. Your browser takes responsibility for performing the transform when you click on one of the XML file links. Figure 2 shows the XML file behind Figure 1. As you can see, it includes the standard XML declaration and a stylesheet reference. The document element is named PetList and it contains all of the information that the transform needs to generate the page. The information for each animal is provided by the attributes of a Pet element. <?xml version="1.0" encoding="utf-8"?> <?xml-stylesheet type="text/xsl" href="PetList.xsl"?> <PetList> <Title>Male Dogs</Title> <LastUpdate>7/10/2004</LastUpdate> <Pet Name="Bart" Photo="images/dogs/male/bart_tn.jpg"/> <Pet Name="Bob" Photo="images/dogs/male/Bob_tn.jpg"/> <Pet Name="Jake" Photo="images/dogs/male/Jake_tn.jpg"/> <Pet Name="Johnny" Photo="images/dogs/male/Johnny_tn.jpg"/> </PetList> Figure 2: XML Pet Data File When you start on a new transform, I recommend that you first create a sample of what you want the final page to look like. If you are like me, it is much easier to focus on the design and layout issues separately from the transformation issues. You can then assemble the transform from the HTML one chunk at a time. You just replace your sample data, conditional constructs, and repeating constructs with the appropriate style sheet language. Along the same lines, building a sample page can help you do a better job of designing the source XML document, if you have control over that aspect of the project. The PetList TransformYou can download a zip of all the files referenced in the following discussion by clicking this link. The transform for the STARS sample page (PetList.xsl) has the following characteristics:
The Stylesheet ElementFigure 3 shows the stylesheet element with its processing instructions and variable declarations. The xsl:include element inserts the contents of the FillerCells.xsl file, which contains a named template that I reuse in all my variable-sized HTML table applications. The xsl:variable elements let me control the number of cells in each row of the table and the dimensions of the images in each cell from one easily accessible location. <?xml version="1.0" encoding="utf-8"?> <xsl:stylesheet xmlns:xsl="http://www.w3.org/1999/XSL/Transform" version="1.0"> <xsl:output method="html" indent="no"/> <xsl:include href="FillerCells.xsl"/> <!-- Page configuration variables --> <xsl:variable name="cellsPerRow" select="3"/> <xsl:variable name="imageWidth" select="120"/> <xsl:variable name="imageHeight" select="160"/> Figure 3: PetList.xsl stylesheet elements. The Root TemplateFigure 4 shows the root template, which matches the root node of the XML document and pumps out the overall page framework. This transform handles all the tags you put out just once, like the head and body tags of the page. It also inserts the main table that separates the page into header, left navigation, and content areas.
<!-- Process the root node to begin the transformation -->
<xsl:template match="/">
<html>
<head>
   <title>STARS - Adorable Adoptables</title>
   <link rel="stylesheet" href="styles.css" type="text/css"/>
</head>
<body>
   <table border="0" cellspacing="0" cellpadding="0" width="100%">
      (Page header row omitted for brevity.)
      <tr>
         <td valign="top">
            <br/><br/>
            <h2>Dogs</h2>
            <dir>
            <p><a class="LeftLink" href="DogsMale.xml">Male</a></p>
            <p><a class="LeftLink" href="DogsFemale.xml">Female</a></p>
            </dir>
            <h2>Cats</h2>
            <dir>
            <p><a class="LeftLink" href="CatsMale.xml">Male</a></p>
            <p><a class="LeftLink" href="CatsFemale.xml">Female</a></p>
            </dir>
         </td>
         <td align="center">
            <table border="0" cellspacing="5" cellpadding="3">
               <tr>
                  <td colspan="{$cellsPerRow}" align="center">
                     <h2><xsl:value-of select="PetList/Title"/></h2></td>
               </tr>
               <xsl:apply-templates select="PetList"/>
            </table>
         </td>
      </tr>
   </table>
</body>
</html>
</xsl:template>
Figure 4: The root template It gets more interesting near the bottom, where it uses the cellsPerRow variable to control the column span for the content area’s title. The title comes from the XML document, and is pulled into the spanned cell with a value-of element. So far, everything I’ve shown you is pretty basic stuff. The only thing that might stand out to some of you is the way I inserted the cellsPerRow variable into the colspan attribute. In this context, the curly braces are effectively short-hand for xsl:value-of. This trick is a great way to avoid having to use the xsl:element and xsl:attribute tags to assemble an HTML tag with variable content. To this day, I have only seen vague references to this technique in MSDN. I wouldn’t even know about it if I hadn’t stumbled into it in someone else’s transform. The Row TemplateThe template that builds the table rows is a bit more interesting. Although this template is only called once (for the PetList node), the xsl:for-each element assembles all the rows of the table. If you are coming from a procedural programming perspective, your inclination might be to build a template that puts out an initial <tr> tag, and then spit out a </tr><tr> combination between each row of cells (see Figure 5). The problem is that when you try to code the template that way, you get errors because the parser thinks the </tr> tag improperly ends the intervening code.
<!-- The WRONG WAY to Build Pet List Rows -->
<xsl:template match="PetList">
   <tr>
      <xsl:for-each select="Pet">
         <xsl:if test="(position() mod $cellsPerRow = 1) and (position() > 1)">
            </tr><tr>
         </xsl:if>
         <td class="PhotoCell" align="center">
            <img src="{@Photo}" width="{$imageWidth}" height="{$imageHeight}"
               border="0" align="top"/>
            <br clear="all"/>
            <xsl:value-of select="@Name"/></td>
      </xsl:for-each>
   </tr>
</xsl:template>
Figure 5: Procedural thinking works poorly in transforms. This is one of those times when you have to think outside the procedural box. XSL is a rule-based, declarative language. The template rules you declare in your transform work with collections of specific source document nodes to build independent constructs (HTML tags in this example). Because the template rule is itself parsed as XML, the constructs within it must be syntactically correct. That is why you have to code your HTML as XHTML, and why your HTML tags interact with the XSL around them. The correct way to solve this problem is to think about the row template as working with one row of source nodes at a time. Figure 6 shows the corrected code. The xsl:for-each statement selects the first Pet node for each row using the mod function and the cellsPerRow configuration variable. Then it applies the cell-building template on that node and however many subsequent sibling nodes it takes to create one row. Note that the "following-sibling" axis provides the set of subsequent nodes, and the template selects a subset of those nodes by comparing their relative position in that set with the cellsPerRow variable. <!-- Build Pet List Rows --> <xsl:template match="PetList"> <xsl:for-each select="Pet[position() mod $cellsPerRow = 1]"> <tr> <xsl:apply-templates select=".|following-sibling::Pet[position() < $cellsPerRow]"/> </tr> </xsl:for-each> </xsl:template> Figure 6: The improved row template. The Cell TemplateThe main purpose of the cell template (Figure 7) is to assemble the table cell for one pet node. It emits a TD tag, a pet thumbnail image tag, and the pet name. It uses the imageWidth and imageHeight variables declared at the top of the style sheet to size the thumbnail images consistently.
<!-- Build Pet List Cells -->
<xsl:template match="Pet">
<td class="PhotoCell" align="center">
<img src="{@Photo}" width="{$imageWidth}" height="{$imageHeight}"
border="0" align="top"/>
<br clear="all"/>
<xsl:value-of select="@Name"/></td>
<xsl:if test="(position() = last()) and (position() < $cellsPerRow)">
<xsl:call-template name="FillerCells">
<xsl:with-param name="cellCount" select="$cellsPerRow - position()"/>
</xsl:call-template>
</xsl:if>
</xsl:template>
Figure 7: The cell template. If the number of Pet nodes you have to process is always evenly divisible by the number of cells in a row, you’d be able to emit the TD tag and be done with it. However, one of the main points of this exercise is to learn how to deal with a variable number of Pet nodes, which means you may have to emit empty TD cells to complete the last row of the table. The xsl:if statement at the bottom of the cell template deals with this issue. Completing the Last RowReferring back to Figure 7, note how the xsl:if statement checks to see if the current node is the last one in the collection and if its position is less than the configured number of cells in a row. This condition can only happen in the last row of the table. You might wonder why the condition works properly. After all, you could have 5 nodes to work with and position 5 will never be less than 3 (the number of cells in a row) when you reach the end of the data on the second row. It works because the context of the cell template is based on the set of nodes passed down from the row template. In other words, the position function returns the relative position of the current node within the passed Pet node subset, not the full set of Pet nodes. If the cell template determines that it is processing the last position but more cells are needed to complete the row, it calls the FillerCells named template passing the number of empty cells it needs to generate. The FillerCells TemplateFigure 8 shows the FillerCells template. This template accepts a parameter that tells it how many filler cells to insert. A filler cell is a table cell that has no specific formatting characteristics and contains a non-breaking space. If you need more formatting control, you could expand the template to accept a style name and different content for the filler cell. <xsl:template name="FillerCells"> <xsl:param name="cellCount"/> <td> </td> <xsl:if test="$cellCount > 1"> <xsl:call-template name="FillerCells"> <xsl:with-param name="cellCount" select="$cellCount - 1"/> </xsl:call-template> </xsl:if> </xsl:template> Figure 8: The FillerCells template. To generate multiple filler cells, the template recurses. The recursive call is the xsl:call-template code you see under the xsl:if test of the cell count parameter. If you know you will need to use the exact same template in several transforms, I recommend that you put that template into a separate file as I did with the FillerCells template. You can collect all of your favorite utility transforms into one file, or you can create a separate file for each one. Then you code either an xsl:include or xsl:import statement into the transform that needs to use the template. I generally use include because it literally includes the file you specify at the location you place the statement. The variables and templates defined in the include file behave exactly as they would if you inserted the actual code into the including file at that point. This approach results in predictable and intuitive behavior. The import statement, on the other hand, has implications you have to watch out for. For one thing, the templates in the imported file generally take precedence over same-named templates in the importing file. I’ve also found that stylesheet-level variable declarations in imported files may not get resolved before you need to reference them. ConclusionAlthough getting started with XML style sheet language can be challenging, you can get a jump on the learning curve by finding examples of how other people have solved similar problems. Few business problems are truly unique. One of the best things about the Internet is that someone has probably published a tip or full sample that demonstrates the very technique you seek. I hope my simple example gave you some extra insight into how you can deal with coding transforms for HTML, and tables in particular. |
|