Most computers manufactured in the last several years come with a Compact Disk (CD) drive that is capable of burning content onto a writeable CD. You can use the burning capability for all kinds of useful things, like backing up important data on your hard drive or archiving your digital photographs. Your CD burning drive is useful for more than just data backup. You can have some fun with it and burn music CDs as well.![]()
To burn CDs, along with the drive, you need burning software. Virtually all Windows computers come with Windows Media Player, and the last few versions have been capable of burning compact disks. However, if your computer came with a read/write CD drive, you probably also got extra software to work with it. For example, my latest Dell computer came with no less than 4 pieces of software that have burning capability!
One of the coolest things about the physical format of a Compact Disk is that it conveniently fits into your audio system’s music CD player. Of course, your music CD player won’t have the faintest idea what to do with a data disk (data is stored differently on the disk than music), but if you burn a disk in the audio format your audio system understands, you play your own music CDs on virtually any audio CD player.
Burnin’ for You
The best news is that you probably have all the tools you need on your computer system to burn music CDs right now. As I mentioned, recent versions of Windows Media Player can burn compact disks, including audio disks. If you don’t have a CD drive on your computer that can write disks, it costs very little to replace that drive with one that can.
You can purchase blank CDs at your local office supply store or order them online. They are very inexpensive now (well under a dollar each), and you can get them in bulk quantities. When you shop for blank disks, you should purchase the CD-R format rather than CD-RW. Some audio systems have problems playing CD-RW disks, so CD-R is safer. It is also cheaper, so you get a small win there. The main disadvantage to CD-R is that once you burn an audio disk, you can’t change it. Plus, if there’s a problem, the CD can be essentially useless (these goofs CDs are often referred to as “coasters” since that’s all they are good for.)
The reasons for burning your own music CDs are numerous. Remember when you used to make traveling music tapes for the cassette player in your car? Or a party tunes tape? Or the “because I love you” tape you made for your girlfriend or boyfriend? Now you can create a CD for the same purposes. You may have purchased individual songs online in MP3 format that you’d like to play in your home or car audio system. Or you may want to create a “mix tape” of favorite tunes culled from your personal music library. If you have particular types of music you like to listen to at particular times, you might want to create a CD just for traveling tunes or exercise tunes.
In this article, I show you how to use Windows Media Player to create a digital library of music on your computer. Then I explain how to create playlists that organize your music into custom collections. Finally, I show you how to create a brand new CD from a collection of songs in your library.
Because it is widely available on Windows computers, I use Windows Media Player in my examples. If you search the Internet, you will find that many alternative products offer more and better features. However, you might want to save that search until after you’ve become familiar with the process of burning music and learn which features you really need.
Ripping Music to Your Computer
The first thing you need to do is build up a library of songs on your computer. The term for copying files from a music CD to your computer is “ripping.” The term may sound nefarious, but there’s nothing illegal about ripping music you paid for. When you buy a music CD or a song off the Internet, you are really licensing the music content itself. That means you can transfer the music to a cassette tape, MP3 player, or your computer for your listening enjoyment wherever you happen to be.
Copying the music for the purpose of selling it or giving it to others is illegal, however. The rule of thumb is that music is licensed to an individual for private enjoyment. As long as you are making a copy for yourself, you are fine from a legal standpoint.
To get the music from your favorite albums onto your computer, follow the steps I’ve outlined below. I’m using Windows Media Player (WMP) version 10. The menu options and basic look of WMP vary somewhat between versions, but you should be able to find similar options in whatever version you have on your system. Use Windows Update [link: updates.microsoft.com] if you have an older version and want to get the latest.
1. First, select the music CD you want to rip. My example uses Tom Petty and the Heartbreakers, Greatest Hits.
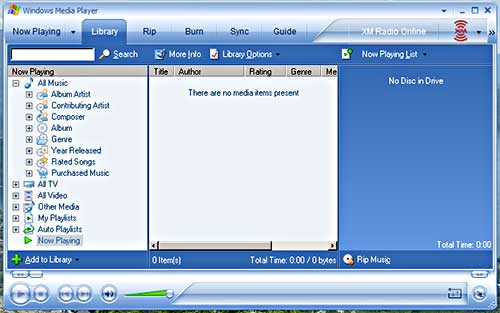
2. Open Windows Media Player. Depending upon how much you have customized your system, you may already have a desktop icon for it. You also probably can find it by choosing Start|Programs|Accessories. You should see something like the image shown below. Note that your media player may start in Guide mode rather than Library mode. Just click the Library tab at the top of the window to switch the display mode.
3. Now click the Rip tab. Initially, the display tells you to insert an audio CD and select the tracks to rip. Go ahead and put your music CD into your computer’s CD drive now. For a few seconds, the track display may show generic information (“Track 1,” “Track 2,” and so forth), but if your computer is connected to the Internet, WMP will try to find album information automatically for you. Eventually, the display should show the correct album and song titles, as shown below.
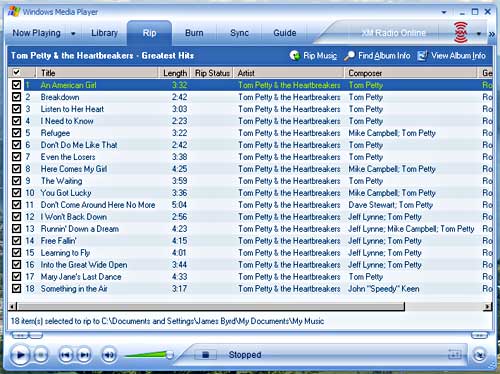
If WMP can’t find information about your album (or it finds conflicting information), you can use the Find Album Info button (at the top of the screen) to search for it.
Also, WMP assumes that you want to listen to the music CD, so it starts playing the album immediately. Just click the Stop icon at the bottom of the screen (the little square) to stop the music.
4. Finally, click the Rip Music button near the top of the window to copy the songs from the CD to your hard disk. Depending upon the speed of the CD drive in your computer and your audio quality settings, the ripping process takes about two minutes per disk.
That’s it! You have just added an album to your computer’s digital music library. You can now play that album from your computer at any time. Of course, you must have speakers or headphones connected to your system to actually hear the music.
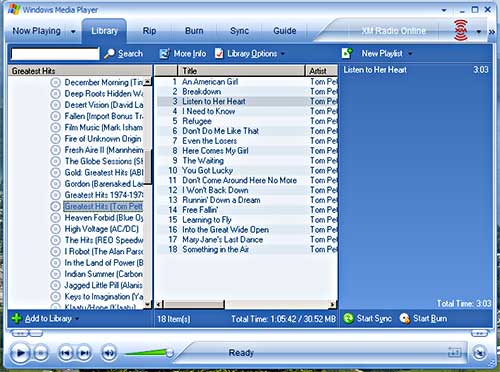
To see and play the album you just ripped, click the Library tab at the top of the window. WMP can display your music library by artist, album, genre, and several other views. Click the Album view and select the name of your album to see the tracks. You can click the Play button (the right-facing triangle at the bottom of the window) or double-click the first song to begin playing the album.
You now have the skills necessary to copy your entire music library onto your computer. All you need is some time and hard drive space.
Creating Playlists
Once you have a nice selection of tunes to choose from, the real fun begins. Remember that album you bought because of one song you liked a lot, only to discover that you really detested almost everything else on the disk? Well, now you can create a custom CD that consists of nothing but your favorite songs from all those miscellaneous albums.
Windows Media Player has a feature called “playlists.” With a playlist, you select a series of songs and save them as a named collection. For example, you might create a “Rock Favorites” list, or a “Mellow Tunes” list. You can create as many playlists as you want, and you can put any number of songs in them. With WMP you can even play your list of songs using “shuffle” (random play) and “repeat” (play over and over until you tell it to stop) options. Best of all, you can create a playlist and then burn it to CD.
You actually don’t have to create a playlist to burn a CD. One of the built-in lists in WMP is the Burn List, which you can build on the fly and burn immediately. However, I’ve found that I usually want to preserve the lists that I assemble, and sometimes I want to build the list up over time and burn it when I have enough songs for a CD. In any case, it is good to know how to create a playlist.
To create a playlist from the Library view, follow these steps.
1. Click the Now Playing List button at the top of the List pane (the rightmost pane of the WMP window). You see a drop-down menu appear with several options. Choose New List|Playlist. The Now Playing List button changes to New Playlist, and you see a message in the List pane that tells you to drag items to build your playlist.
2. Now use the leftmost (Contents) pane, to find the music you want to add to your new playlist. As you drill down in the Contents pane, the Details pane (the center one) changes to show the corresponding music tracks.
3. Once you see a track you want to add to your playlist, click the track in the Details pane and drag it to the playlist pane. Alternatively, you can click the little green play icon with a plus sign on it at the top of the List pane to add the track to your playlist. If you already have several tracks in the playlist, you can drag a new track to a specific position just by hovering your cursor until you see the insertion point you want. WMP shows the insertion point as a grey line.
4. Repeat the process to add more tracks to your playlist. Use the Contents pane to locate the tracks you want to add, and then drag them to your playlist from the Details pane.
5. When your playlist is done, click the New Playlist button and choose Save Playlist As from the dropdown menu. You’ll see the standard Windows Save As dialog and you can give your new playlist a name. WMP keeps a record of your playlists in the My Playlists collection in the Contents pane.
As you add tracks to your playlist, you will notice that WMP tells you the “Total Time” of the songs you’ve selected at the bottom of the playlist pane. If you plan to burn your playlist to CD, you’ll want to keep a close eye on that figure, because a CD holds a maximum of about eighty minutes (one hour and twenty minutes) of music. If you are just going to play the list on your computer, you don’t need to worry about that.
Keep in mind that you can always create a playlist from other playlists. You just navigate to My Playlists in the Contents pane and select the list you want to use as a source. Then you can add tracks to your new playlist using the same technique you used to create a playlist from albums.
Burning a CD from Your Music Library
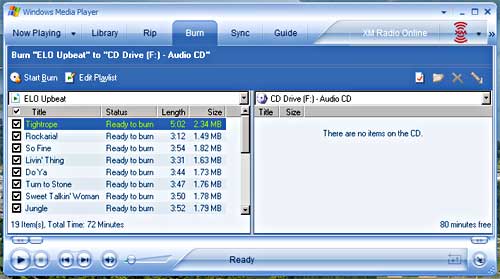
Once you assemble a playlist, you are ready to burn a CD. In Windows Media Player, click the Burn tab. You’ll see something like the image below. The left pane has a dropdown that lists your playlists, albums, and other sources of songs to record. The right pane shows the contents of your recordable CD drive.
To burn your playlist, follow these steps:
1. Select a playlist from the dropdown menu at the top of the left pane. WMP shows the songs in the selected list with little checkmarks next to them. The screen shot above shows that I’ve selected my “ELO Upbeat” playlist. (Yes, I’m a child of the seventies.)
2. Insert a blank CD-R into your recordable CD drive. As I mentioned, some home audio systems have trouble playing CD-RW disks, so I recommend you stick with the CD-R format. The screen shot also shows what it looks like when a blank disk is in the drive. Notice that the right pane shows 80 minutes free at the bottom.
3. The total time for your playlist is shown at the bottom of the left pane. If your playlist is over 79 minutes, you’ll need to uncheck some of the songs until the total time is 79 minutes or less. I recommend 79 minutes because WMP inserts a couple of extra seconds between each song, so you can’t really fit a full 80 minute playlist onto a disk. Unchecking songs does not remove them from the playlist, it just excludes them from the burning process. My list is 72 minutes, so I’ve got nothing to worry about.
4. Click the Start Burn button at the top of the window. The button changes to Stop Burn, which you can use to cancel the burn process.
Burning is actually a two-pass process. In the first pass, WMP converts your music files from the format it uses for storage in the digital library to a format that is compatible with an audio CD. In the Status column of the left pane, WMP shows you its progress as it converts each song, as shown below.
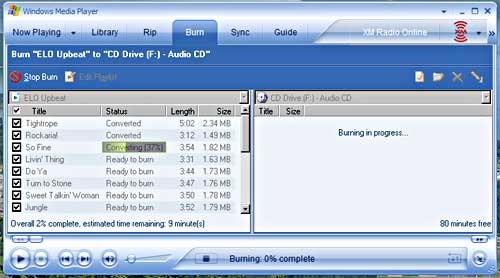
The second pass is the burning pass, where WMP actually writes the songs to the CD. Again, the Status pane shows you the progress of the burning process. By default, when the disk is completed, the CD drive ejects your shiny new disk.
You are now ready to try out your disk on your home or car audio system!
Troubleshooting Tips
If you run into trouble the first time you burn an audio CD, don’t panic. You aren’t the first person to create a drink coaster instead of the fabulous CD of your dreams. The first time I burned a disk from WMP, it sounded terrible. I heard this horrible digital distortion that made the disk I’d so carefully created useless. The answer to my problem turned out to be the burn settings on my drive.
Write Errors and Digital Noise
If you don’t specify otherwise, WMP tries to write the disk as fast as it thinks the drive can handle. Unfortunately, WMP doesn’t seem to be very smart at figuring out exactly what that speed should be. (Avoiding this kind of problem is one of those areas where third party products often outshine Media Player.) You can teach WMP to behave itself by clicking the little check-marked page icon at the top of the right pane. That icon displays the properties and settings for the drive (see image below).
The second dropdown controls the write speed of your drive. The default is “Fastest,” which is fine if it works for you. In my case, I set it to a conservative 16X, which is much slower than my drive’s rated speed, but it produced excellent results.
Volume Leveling
The drive properties dialog also has a Quality tab, which is shown below.
When you created your playlist, you probably selected songs from multiple albums. Signal levels can vary substantially between albums, so you may end up with songs from one album sounding much louder (or quieter) than the others on playback.
WMP offers a feature called “volume leveling” that attempts to correct this problem. When you burn a CD and have volume leveling turned on (which is the default setting), WMP tries to adjust the volume of each song so they all play back at a similar level. If you prefer to preserve the original song volume levels, just uncheck this option.
Tuning Audio Quality to Save Disk Space
As you expand the digital music library on your computer, you may find that you are using up quite a bit of disk space. The default setting for WMP is to create a Windows Media Audio (WMA) file at 128 Kbps (thousand bits per second). Even with compression, that setting translates to about 56 MB per CD.
You can change the default rip settings and reduce the amount of hard drive space that is consumed by your music library. To change the settings, click the little down arrow at the top right of the WMP window and display the menu. Then choose Tools|Options, to display the Options dialog box. Click the Rip Music tab to see your current rip settings (as shown below).

Use the Audio quality slider at the bottom of the Rip Music tab to experiment with different quality settings. Some of the rules that apply to digital photographs also apply to digital music: the higher your quality settings, the larger your files. For example, if you set your audio quality to 64 Kbps, you’ll use half the disk space of the default setting, but you may be able to hear a difference in the sound quality.
I selected 64 Kbps for my computer, since I’d be surprised if most people could tell the difference between a song played off the original CD and the same song played off of a CD I burned from a 64 Kbps file. (I certainly can’t tell, but as my wife likes to point out, my hearing has been compromised by too many loud concerts in the 70’s and 80’s.)
The point is that you can pick the setting that works best for you. You might even pick a higher setting if you’ve got tons of disk space and you can hear the difference.
Digital Pyromania
Using playlists, you can be the ultimate disk jockey for your favorite music. Now that you know how to burn, you can put together a special CD with all the songs you want to hear on your next car trip or at your next party. Once you experience the freedom of making disks of your own, you may find yourself with a case of digital pyromania, with stacks of newly minted audio disks piling up in the passenger seat of your car.