ASP.NET user controls provide a great way to encapsulate common user interface functionality for your web applications. By eliminating duplicate code, user controls can save you a lot of development and debugging time.
Key Technologies and Concepts |
| Microsoft ASP.NET
User Controls User Control Events Custom Event Arguments EventArgs EventHandler EventHandler<TEventArgs> |
User controls don’t stand alone. You add them to a page with other user and server controls, and you “wire them up” to the page through their properties and methods. Working with a user control’s properties and methods is as easy as working with any class.
Most user controls are “plug and play.” You set a few properties and call methods during the processing of page load and standard control events. The user control manages its own user interface and processes the information it collects.
But sometimes you need to hook directly into the control’s process flow. Every page that hosts the user control has different requirements, and a page may need to take specific actions in response to activity that takes place within the user control. For example, if your user control adds collected information to the database, the hosting page may need to know when that happens so it can take additional action.
This requirement is a perfect opportunity to take advantage of events, the third type of class member (properties and methods being the first two).
Events are a little trickier to code than properties and methods. They involve delegates, which are a confusing topic for many .NET developers. This article will give you a pattern that makes it easy to add and wire up user control events you build yourself.
Overview of the Process
The coding pattern I’m going to show you consists of the following steps:
- Create a custom EventArgs class (optional)
- Create an event member in the user control
- Create a method to raise the event
- Call the raise method at the appropriate place(s) in the user control
- Create an event handler in the hosting page
- Assign the event handler in the hosting page’s user control declaration
It may sound like a lot to do, but there really isn’t much code involved. The hard part is just figuring out what to do in the first place, and the pattern takes care of that for you.
The NavButtons Sample User Control
The sample code I’ll use for demonstration purposes is based on a simple navigation user control called NavButtons. Here’s what the control looks like when it is sited on my test page:
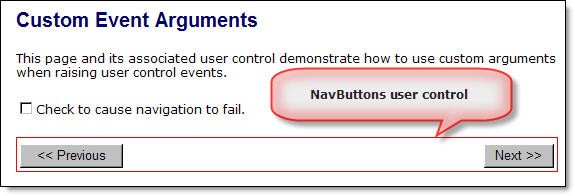
The NavButtons user control has the following characteristics:
- It has a Next and Previous button, suitable for use in a wizard-style interface.
- It has a single event named “Navigate” that notifies the hosting page when a user clicks one of the buttons.
- It uses a custom event argument named “Direction” to indicate which button was pressed.
- It uses a custom event argument named “Cancel” to detect when the calling page canceled navigation.
The next few sections show you step-by-step how to code the user control and the hosting page, but I’ve also included complete listings of the user control and the hosting page at the end of the article.
Creating a Custom EventArgs Class
Most simple control events have no specific event data, so they use the built-in EventArgs class. The Page_Load event is one example:
protected void Page_Load(object sender, EventArgs e) { }
The EventArgs class has no properties because the control doesn’t need to pass anything to the page that handles the event, and the control doesn’t need to receive anything back from the page either. The EventArgs class is just a placeholder.
If you don’t need custom arguments, you can skip this step and just inherit from the standard (non-generic) EventHandler class, which uses EventArgs for its arguments, when you create the event member in the next step.
If you do want custom arguments, all you have to do is create a class that inherits from the EventArgs class, like I did for my NavButtons control:
public class NavButtonEventArgs : EventArgs {
  public NavButtonDirection Direction { get; set; }
  public bool Cancel { get; set; }
}
The NavButtonEventArgs class uses the NavButtonDirection enum (shown below) to indicate what direction the user wants to navigate, and it defines a Cancel property so the event handler can indicate that it encountered an error while processing the navigation request.
Here’s the NavButtonDirection enum:
public enum NavButtonDirection {
Unknown = 0,
Next = 1,
Previous = 2
}
One of my coding conventions for enumerations is to always set item 0 to “Unknown,” which becomes the default value for any variable declared with that type. This practice can help you avoid nasty bugs that can arise from passing around un-initialized enum variables.
Creating an Event Member
The next step is to declare the event member in the user control. The purpose of the event member is to give hosting pages a way to connect an event handler method to the custom control. You declare the event member with either the EventHandler or EventHandler<TEventArgs> delegate. Both are built-in .NET Framework classes.
If you don’t need custom event arguments, you can use the plain EventHandler delegate. For example, if my custom control raised two separate events for the next and previous buttons, and it didn’t need to process a cancel response from the event handler, I could declare the two events like this:
public event EventHandler NavigateNext;
public event EventHandler NavigatePrevious;
Since I do need custom arguments, I need to use the EventHandler generic instead. Here’s how the declaration for NavButtons looks:
public partial class NavButtons : System.Web.UI.UserControl {
  public event EventHandler<NavButtonEventArgs> Navigate;
}
I’d like to point out a couple of things here before we go on.
First, using one of the built-in EventHandler delegates rather than a delegate class of your own gives you a tremendous advantage: it lets you wire up event handlers using attributes on the control declaration in the markup of the hosting page. You’ll see how that works later on, but the event declaration you see here is what makes it possible.
Second, keep in mind that .NET automatically adds the “On” prefix to your event name for you. For example, intellisense will show the NavigateNext event as “OnNavigateNext.” In fact, if you add the prefix to your event declaration, you’ll end up with “OnOnNavigateNext.”
Creating a Raise Method
It’s a good idea to isolate the code that raises the control event and processes any response that may come back from the hosting page. I usually create a private raise method in the user control class. Creating a separate method lets you call the event from multiple places if necessary and encapsulates the idiosyncrasies of raising events.
By my own convention, I name these private “raise methods” by combining the event name with a “Raise” prefix. Here’s the raise method declaration for my navigate event:
private bool RaiseNavigate(NavButtonDirection direction) {
  bool cancelNav = false;
  // Copy handler to temp var to make operation thread safe:
  EventHandler<NavButtonEventArgs> handler = Navigate;
  // Verify that a handler is "attached"
  if (handler != null) {
    NavButtonEventArgs args = new NavButtonEventArgs();
    args.Direction = direction;
    args.Cancel = false;
    handler(this, args);
    cancelNav = args.Cancel;
  }
  return cancelNav;
}
The RaiseNavigate method is responsible for the following tasks:
- Verify that a handler has been assigned to the event.
- Allocate the custom event arguments class (NavButtonEventArgs) and initialize it with information that must be passed down to the attached event handler.
- Call the attached event handler.
- Retrieve information passed back from the event handler.
Note that the raise method immediately copies aside the current event handler reference into a local variable so the rest of the operation is thread-safe.
Calling the Raise Method
You are just about done with the coding in the user control. The last thing you need to do is call your raise method at the appropriate location.
The NavButtons control calls its RaiseNavigate method when the user clicks either the Next or Previous button. Here’s the code:
protected void btnPrevious_Click(object sender, EventArgs e) {
  lblNavigationCanceled.Visible = RaiseNavigate(NavButtonDirection.Previous);
}

protected void btnNext_Click(object sender, EventArgs e) {
  lblNavigationCanceled.Visible = RaiseNavigate(NavButtonDirection.Next);
}
The control passes the direction that the user selected (NavButtonDirection.Next or .Previous), and gets back a boolean that indicates whether or not the navigation request was canceled. It uses that boolean to set the visibility of a message it displays when navigation is canceled.
Here’s what the control looks like when it detects a navigation failure:

That’s it for the user control. Next, you’ll see how to use the Navigate event from a web page.
Creating an Event Handler
You add an event handler method to your hosting page so it can respond to the event when the user control raises the event. The signature of the event handler in the hosting page must match the signature of the event delegate in the user control.
The event handler I defined in my test page looks like this:
protected void ucNav_Navigate(object sender, NavButtonEventArgs args) {
  if (chkFailNav.Checked) {
    lblNavDirection.Text = "Navigation failed.";
    args.Cancel = true;
  } else {
    lblNavDirection.Text = "Navigate " + args.Direction.ToString();
    args.Cancel = false;
  }
}
The important thing to note is that the event handler declares the args as NavButtonEventArgs, not EventArgs. The rest of the code just exercises the user control through the NavButtonEventArgs properties. It uses the Direction property to display a message saying which navigation button was clicked, and it uses the value of a check box on the page to set the Cancel property.
Wiring Up the Event Handler
You wire up the event handler to the control event just like you would any other control event: you assign a method name to the appropriate attribute, as shown below.
First, you register the control:
<%@Register Src="~/Controls/NavButtons.ascx" TagName="NavButtons"
  TagPrefix="nm" %>
Then you declare the control:
<nm:NavButtons ID="ucNav" runat="server" OnNavigate="ucNav_Navigate" />
The test page uses the OnNavigate attribute of my user control and assigns the ucNav_Navigate method as the event handler.
The Joys of EventHandler<TEventArgs>
Now you have a coding pattern you can apply any time you need to add custom event handlers to a user control.
As long as you extend the built-in EventArgs class to create your own event arguments, you can use the EventHandler generic to declare an event that uses those arguments, and you can wire it up to a page through an attribute on your user control. This technique is much easier than creating and managing your own delegates for control events.
Code Listings
The complete listings for my test page and user control are shown below. You are welcome to use any of the code presented in this article for your own projects. Attribution is appreciated but not required.
CustomEventArgs.aspx
<%@ Page Title="Nerdy Musings Demo - Custom Event Arguments"
  Language="C#"
  MasterPageFile="~/Demo.Master" AutoEventWireup="true"
  CodeBehind="CustomEventArgs.aspx.cs"
  Inherits="NerdyMusings.DemoSite.CustomEventArgs" %>
<%@Register Src="~/Controls/NavButtons.ascx"
  TagName="NavButtons" TagPrefix="nm" %>

<asp:Content ID="Content2" ContentPlaceHolderID="cphPageContent"
  runat="server">
  <h1>Custom Event Arguments</h1>
  <p>This page and its associated user control
    demonstrate how to use custom arguments
    when raising user control events.</p>
  <p><asp:CheckBox ID="chkFailNav" runat="server"
    Text="Check to cause navigation to fail." /></p>
  <nm:NavButtons ID="ucNav" runat="server"
    OnNavigate="ucNav_Navigate" />
  <p><asp:Label ID="lblNavDirection" runat="server"
    ForeColor="Blue"></asp:Label></p>
</asp:Content>
Note: CustomEventArgs.aspx uses a master page in my demo project, which I didn’t include here because it’s not relevant to the example. The main thing is that you see what controls are on the page itself.
CustomEventArgs.aspx.cs
using System;
using System.Web;
using System.Web.UI;
using System.Web.UI.WebControls;
using NerdyMusings.DemoSite.Controls;

namespace NerdyMusings.DemoSite {
  public partial class CustomEventArgs : System.Web.UI.Page {

    protected void ucNav_Navigate(object sender, NavButtonEventArgs args) {
      if (chkFailNav.Checked) {
        lblNavDirection.Text = "Navigation failed.";
        args.Cancel = true;
      } else {
        lblNavDirection.Text = "Navigate " + args.Direction.ToString();
        args.Cancel = false;
      }
    }

  }
}
NavButtons.ascx
<%@ Control Language="C#" AutoEventWireup="true"
  CodeBehind="NavButtons.ascx.cs"
  Inherits="NerdyMusings.DemoSite.Controls.NavButtons" %>
<table width="100%" style="border:solid 1px red;">
  <tr>
    <td colspan="2" align="center">
      <asp:Label ID="lblNavigationCanceled" runat="server"
        ForeColor="Red"
        Text="Navigation was canceled. Please review your input for errors before continuing."
        Visible="false"></asp:Label></td>
  </tr>
  <tr>
    <td width="50%">
      <asp:Button ID="btnPrevious" runat="server"
        OnClick="btnPrevious_Click" Text="<< Previous" /></td>
    <td width="50%" align="right">
      <asp:Button ID="btnNext" runat="server"
        OnClick="btnNext_Click" Text="Next >>" /></td>
  </tr>
</table>
NavButtons.ascx.cs
using System;
using System.Web;
using System.Web.UI;
using System.Web.UI.WebControls;

namespace NerdyMusings.DemoSite.Controls {
  public partial class NavButtons : System.Web.UI.UserControl {

    public event EventHandler<NavButtonEventArgs> Navigate;

    protected void btnPrevious_Click(object sender, EventArgs e) {
      lblNavigationCanceled.Visible =
        RaiseNavigate(NavButtonDirection.Previous);
    }

    protected void btnNext_Click(object sender, EventArgs e) {
      lblNavigationCanceled.Visible =
        RaiseNavigate(NavButtonDirection.Next);
    }

    private bool RaiseNavigate(NavButtonDirection direction) {
      bool cancelNav = false;
      // Copy handler to temp var to make operation thread safe:
      EventHandler<NavButtonEventArgs> handler = Navigate;
      // Verify that a handler is "attached"
      if (handler != null) {
        NavButtonEventArgs args = new NavButtonEventArgs();
        args.Direction = direction;
        args.Cancel = false;
        handler(this, args);
        cancelNav = args.Cancel;
      }
      return cancelNav;
    }
  }

  public enum NavButtonDirection {
    Unknown = 0,
    Next = 1,
    Previous = 2
  }

  public class NavButtonEventArgs : EventArgs {
    public NavButtonDirection Direction { get; set; }
    public bool Cancel { get; set; }
  }

}