If you don’t care much for your blog’s administration tools, you might want to give Windows Live Writer a try. Part of Microsoft’s Windows Live program offerings, "Writer" is a small Windows program that runs right on your home or office computer.
You can use Writer to update your blog without having to log in with your Web browser. Instead, you compose your blog entries right in Writer and "publish" the new blog entry when you are ready. Writer takes it from there and transfers your blog entry to your blog.
To use Writer, your blog must support one of the communication interfaces that Writer knows how to use, but you should have no problem with most popular blogs like WordPress and Blogger.
In most cases, you can do common things like format your text, include hyperlinks, add images, and assign categories. However, not all blogs are created equal, so you might not be able to do everything through Writer. Our Subtext blog, for example, does not let us create new categories through Writer, although we can assign existing ones.
We use Windows Live Writer because logging into Subtext and creating a new post with a browser is a slow process. Part of the problem is our satellite Internet connection, and part of the problem is the Subtext interface itself. Writer can remember your login information, so all you have to do is type and click Publish!
Installing Windows Live Writer
Installing Windows Live Writer on your computer is fast and easy. You just download the Windows Live Installer from the Microsoft web site and run the installation program.
The installer download itself is about 2.5 megabytes, but it will download additional files depending on the options you select, as I explain shortly. Your computer needs to be running Windows XP Service Pack 2 or Windows Vista to use the Windows Live programs.
Here’s the direct link to the download page.
If that link doesn’t work, try searching for "Windows Live Writer download" in Google, and it will probably be one of the first links you see.
The Windows Live Installer can install several different Windows Live software programs. Check all the ones you want to install, but be sure to at least check Writer, which is a 5-megabyte download. Click the Add to Installation button and the installer will download and install Writer.
Connecting to Your Blog
The first time you run Windows Live Writer, the program asks you if you want to create a new Windows Live Space weblog or if you want to connect to an existing weblog. My instructions here assume you already have a blog, so select the "I already have a weblog set up" option. When you click Next, Writer starts the weblog account wizard.
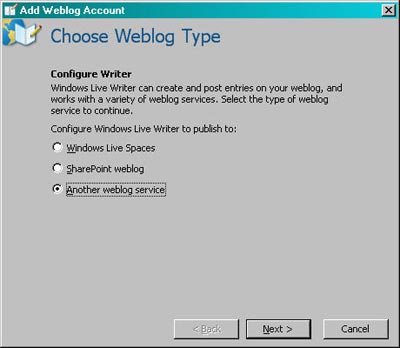
The account wizard first asks you what type of blog you have (see Figure 1). If you have a Windows Live Spaces account or you are accessing a SharePoint weblog, select one of the first two options. If you use Blogger, WordPress, or any other blog service, select the "Another weblog service" option.
The wizard next asks you for the URL of your blog and your login information (see Figure 2). Enter the URL that goes directly to the home page of your blog. Also enter the Username and Password you normally use to log into your blog and create posts. If you check the "Save my password" option, Writer will be able to work with your blog without asking you for a password every time.

When you click Next at this point, Writer tries to connect to your blog and discover its editing capabilities. Not all blogs are created equal, and many of them support only a subset of Writer’s features. For example, the Subtext blog software that drives our Logical Expressions blog does not let you add new categories, but you can associate existing categories with your posts.
Technical Note:
Some blog software is capable of working with Windows Live Writer, but you need to enter a special URL to hook it up.
Our membership site at www.naprp.com is powered by DotNetNuke and uses the built-in blog module. Writer doesn’t support this blog module directly. We had to add a third party module called itcMetaPost that knows how to work with the blog module and with Writer.
The itcMetaPost module communicates with Writer through the Metaweblog API. It translates the Metaweblog requests it receives from Writer into the appropriate blog actions. Because of this arrangement, the URL we had to specify in Writer points to the itcMetaPost module, not the blog home page.
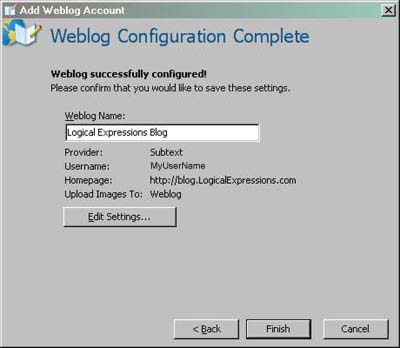
The last wizard dialog lets you review your settings (see Figure 3). By default, Writer gets your blog name from the blog itself, but you can override the name if you want to call it something else within Writer.
Adding New Posts
Once Windows Live Writer is installed and configured with your blog settings, it opens with an empty post (see Figure 4). You immediately see a content area with a menu, toolbar, and right-side tool panel. You are ready to blog!
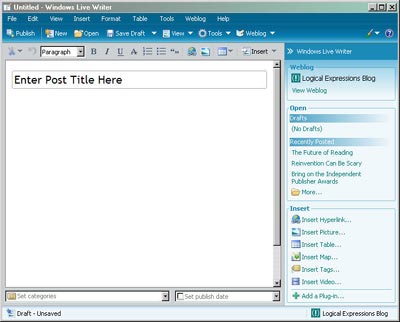
Start by clicking in the "Enter Post Title Here" area, and enter a title for your new blog entry. Tab out of the title area or click in the content area under the title, and start entering your post content.
You can apply standard formatting to your text, such as bold, italics, etc. You can also apply standard HTML styles like headings, bulleted lists, and more. Writer even includes a built-in spell checker, which alerts you to spelling errors as you type.
When you are finished typing your blog entry, click the Publish toolbar button. Writer automatically logs in to your blog, posts the new entry, and then displays the new entry in a browser window so you can see how it came out. If you don’t feel a need to review the entry after you post, you can turn that feature off in the Preferences tab of the Options dialog.
Inserting Hyperlinks
The web is all about making connections, so adding a link to your post is something you’ll probably want to do right away. I created a sample post that includes a link to the Windows Live Installer download page (see Figure 5).

The easiest way to create a link is to highlight the text you want to use for the link and click the link toolbar button (the icon is a little earth with a chain link). You can also position your cursor at the place you want to add the link and click Insert Hyperlink in the right panel. Either way, Writer opens the Insert Hyperlink dialog (see Figure 6).
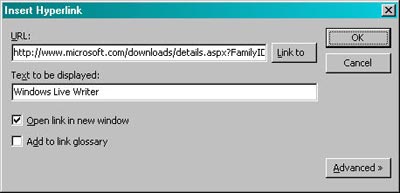
Now just enter the URL you want to use. If you want to open the link in a new browser window, check the "Open link in new window" option. If you highlighted text, Writer automatically puts it into the "Text to be displayed" field, otherwise just type the text you want to display for the link. Click OK when you are ready to insert the link into your post.
Inserting Images
Another popular thing to do with your blog is to add pictures and other images to your posts. Adding images to a post in some blog software is a pain. This is an area where Windows Live Writer can really make your day.
To insert an image, position your cursor at the desired location in your post and click the Insert Picture toolbar button (which has a little landscape picture icon) or click Insert Picture in the right panel. Writer displays the Insert Picture dialog, which lets you select an image on your computer or get the image from a web URL. Click Insert when you have selected the image you want to use, and Writer adds the image to your post (see Figure 7).
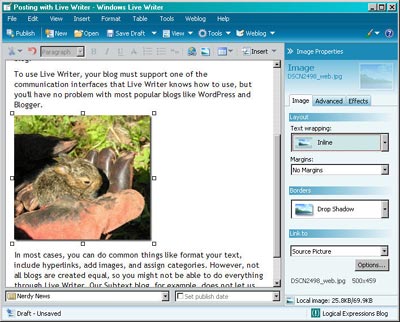
Writer does several things for you to help optimize your images for use on the web. It automatically creates a thumbnail image of your picture and puts it in the post. The thumbnail image links to a larger image.
If you don’t like something about the way the image is displayed, you can customize its appearance with the settings in the right panel. These settings appear whenever you select an image in your post. The basic settings let you control how text wraps around the image, how big of a margin to allow, and what kind of border you want. The Advanced tab lets you control image size, rotation and contrast, and the alternate text. The effects tab lets you tweak the picture with transformations (like Sepia Tone) or a watermark. Writer’s image editing features may not be much, but they are easy to apply and handle most of the needs of your average blogger.
Setting Categories
One last common "bloggy" thing to do is to categorize your posts so it is easier for your visitors to locate the content that is most interesting to them. As I mentioned earlier, Windows Live Writer’s category features depend upon your blog’s capabilities, so you may not be able to work with categories at all, or you may be able to add new ones and/or assign existing ones.
If you look back at Figure 7, you’ll see a category drop-down at the bottom of the main window that shows the "Nerdy News" category I already assigned to the post. If you click on the drop-down, you get the category assignment popup (see Figure 8).
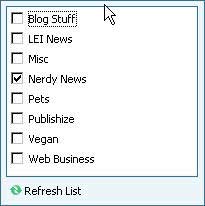
The first time you display the popup, or whenever you add new categories directly through your blog, you might need to click the Refresh List option at the bottom of the list. Writer connects to your blog and pulls down the latest categories.
Check all of the categories that apply and then click the arrow again or click anywhere in the main window to close the popup. Now, when you publish your post, Writer automatically assigns the post to the selected categories.
Saving Drafts
We live in a world of increasing distractions. There’s likely to be a day when you’ll need to put aside the post you were working on before it is ready to be published to your blog. Windows Live Writer can help you with that.
At any time while you are working, you can click the Save Draft toolbar button to save your work. You can also press the Ctrl-S shortcut key or choose File|Save Local Draft. Writer saves aside the post and displays it in the right panel under Drafts (see Figure 9). You can then safely close the program without losing your work.
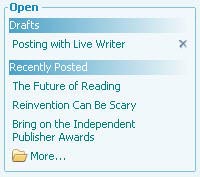
When you are ready to continue working on your post, you can open Writer and click on the draft title to re-load it. When you finish your editing session, you can publish the draft just as you would any other post.
If you decide that you no longer want to keep the draft, click on the delete icon next to the draft title and Writer will remove it from the draft list.
Posting to Multiple Blogs
If you have more than one blog and you want to use Windows Live Writer for all of them, you can set up additional blog accounts. Choose Tools|Accounts from the main menu, which displays the Accounts tab of the Options dialog. The Accounts tab lets you maintain all of your blog account settings.
Click the Add button to add another blog to Writer. The process for setting up additional blogs is the same as what I described earlier for the first blog.
After you add a new blog, it appears on the menu and the toolbar under "Weblog." To switch blogs, just click the appropriate Weblog menu item.
Simple Is Good
One of the best things about Windows Live Writer is its simplicity. However, keep in mind that Writer is a generic tool that works with many types of blogs, and as such, it tends to have "least common denominator" features. If you need to do anything with your blog’s configuration settings or specialized features, Writer probably can’t help you.
On the other hand, most of what bloggers do is blog. If you just need a quick and easy way to post new blog entries, particularly if you post to multiple blogs, Windows Live Writer is a nice tool for the job.