Many businesses use QuickBooks to manage their company finances. The program is fairly easy to use, in spite of the powerful features it includes. Intuit, the publisher of QuickBooks, spent a lot of time setting up the program with defaults that help you get going quickly.
However, I’m amazed at how many companies send invoices to their customers using the plain, default format that comes with the program. The format is certainly functional, but it includes none of the company "branding" that your marketing efforts have worked so hard to develop.
Fortunately, QuickBooks includes features that give you almost complete control over how your invoices look. With just a few simple changes, you can take your invoice from blah to ah-ha!
This article explains how you can add your company logo to your invoices and how to customize the information that appears on your invoices. All you need is a logo image file and about a half-hour of your time to design an invoice that you aren’t embarrassed to send to your customers.
My instructions were developed using QuickBooks 2007. QuickBooks 2008 just landed on my doorstep, but it does not appear that Intuit made any major changes to the way invoice templates work. It should also be easy to adapt the instructions to older versions of QuickBooks. Older versions had a single Customize Invoice dialog that did the work of the later Basic Customization and Additional Customization dialogs, but all of the settings are fundamentally the same. Additionally, the Layout Designer hasn’t changed much in about a decade.
Choosing a Logo
One of the most significant things you can do to improve the appearance of your invoices is to add your logo to them. Adding a logo to your invoice is easy to do, but there are some preparatory steps you can take to make your logo look its best.
Invoices are often printed, as opposed to being viewed on a monitor. Also, the printer is likely to be a black-and-white laser printer. The intended output medium has an affect on how you create or select an image for your logo.
- The logo should look good in black-and-white. If your logo image is in color, it may look strange when it is converted to shades of grey. If necessary, convert the image to grey scale and adjust it or simplify it to make it print more clearly.
- The return address window in the typical windowed envelope is about 7/8 of an inch tall by 3 1/2 inches wide. I’d shoot for more like 3/4 inch tall by 3 1/4 inch wide to allow for folding and paper size variations, particularly if the logo does not include much white space around it. An image resolution of 300 dots-per-inch works out well for most printers, so that means your logo should be 225 pixels tall. If the logo image file includes your address information, it should not be more than 975 pixels wide.
- You can always adjust the size of the logo from within QuickBooks, but doing that can affect the quality of the resulting output. It is best to start out with an image that requires as little scaling as possible.
Creating a Custom Invoice Template
You can create your own custom invoice template by creating a new template or by duplicating an existing template. You can also download free templates from Intuit. In this article, I’ll focus on the first two options.
If you create a new invoice template, you get a simple default invoice with common fields and labels. The default may suit your needs, or it may not.
Alternatively, you can choose from several "predefined" invoices that QuickBooks provides. To save yourself a lot of time later, I recommend that you compare all of the predefined templates and the default template, and pick the one that is closest to what you want. If you start with an invoice that is close to what you want, you’ll have less tweaking to do later.
To create a custom invoice template using the QuickBooks default:
- Choose Lists, Templates from the QuickBooks main menu. QuickBooks displays the Templates dialog (see figure 1).
- Click the Templates button at the bottom of the Templates dialog, and choose New from the popup menu that appears. QuickBooks displays the Select Template Type dialog.
- Select Invoice and click OK. QuickBooks displays the Basic Customization dialog (see figure 2).
- If you just want to see what the template looks like so far, the Preview pane gives you a rough idea. Click the Print Preview button if you want to get a closer look.
- If you want to save the invoice, click the OK button; otherwise, click the Cancel button.
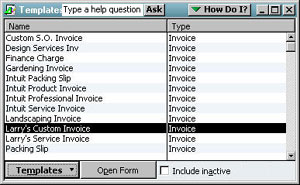
Figure 1: Templates Dialog
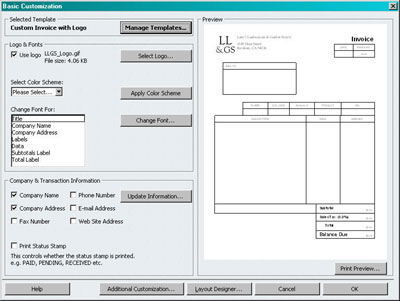
Figure 2: Basic Customization Dialog
To create a custom invoice template using a QuickBooks predefined template:
- Choose Lists, Templates from the QuickBooks main menu. QuickBooks displays the Templates dialog.
- In the Templates dialog, select the predefined template you want to use.
- If you just want to see what the template looks like, click the Templates button, choose Edit Template from the menu, and look at the Preview pane in the Basic Customization dialog.
- If you want to customize a predefined template, select it, click the Templates button, and choose Duplicate from the popup menu. QuickBooks displays the Select Template Type dialog.
- Select Invoice and click OK. QuickBooks inserts a new template into the list with a default name (for example, "Copy of: Intuit Service Invoice").
- Select the new template and click the Templates button again. Now choose Edit from the popup menu.
One of the first things you’ll want to do is rename your template. For some reason, Intuit does not give you a rename feature in the templates list, nor did they make the name editable in the Basic Customization dialog. Instead, you have to click the Manage Templates button on the Basic Customization dialog and change the template name above the Preview pane, and then click OK.
Selecting Invoice Fields
As the name suggests, the Basic Customization dialog gives you access to the basic settings related to the invoice template. It lets you control the logo and fonts as well as the company information that appears at the top of the invoice.
To control the remainder of the invoice elements, click the Additional Customization button, and QuickBooks displays the Additional Customization dialog (see figure 3). This dialog has tabs that let you control which fields and columns appear on your invoice.
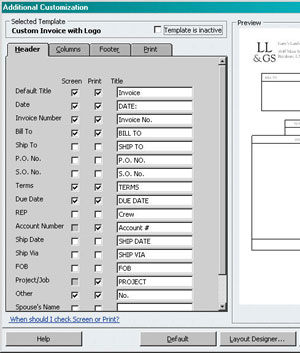
Figure 3: Additional Customization Dialog
For fine-tuning the appearance of your invoice, you can always use the Layout Designer, but I recommend that you do as much as you can through the Basic and Additional Customization dialogs first, and then use the Layout Designer afterward. QuickBooks does a lot of the layout work for you if you take this approach.
On most of the Additional Customization tabs, you put a check mark next to the fields you want to include on your invoice and uncheck the ones you don’t. QuickBooks automatically positions both the field and its label on the invoice for you. Most fields have a Screen check box and a Print check box. The Screen check box controls what fields are shown on the invoice you see while working in the Invoice dialog. The Print check box controls what fields are shown on the invoice when you print it out.
Here’s a brief description of what the tabs do for you:
- Header: The header tab controls the common invoice elements that are typically in the top portion of the page, including the invoice number and customer billing information.
- Columns: The columns tab controls what columns appear in the item detail table that fills the middle of the invoice.
- Footer: This footer tab controls the fields that usually appear at the bottom of the page, including the total and sales tax information.
- Print: The printer tab lets you override certain printer settings.
Adding a Logo to Your Invoice
You use the Basic Customization dialog to add a logo to your custom invoice. The procedure for adding a logo is very simple:
- In the Logo & Fonts section of the dialog, click the Use Logo check box. QuickBooks displays the Select Image dialog.
- Navigate to the image you want to use and click the Open button. QuickBooks displays the logo in the logo section along with the file name and size.
If your logo file includes your company name and address, you may want to uncheck those fields in the Company & Transaction Information section.
Editing the Layout
The customization dialogs give you quite a bit of control over what elements appear on your invoice, but they don’t let you control the positioning of those elements. They also don’t give you fine control over the display characteristics of individual elements. To manipulate those aspects of your custom invoice, you have to utilize the Layout Designer.
You access the Layout Designer from either customization dialog. Just click the Layout Designer button located at the bottom of the dialog, and QuickBooks displays your custom invoice in the Layout Designer.
When you create a new template and alter the field settings with the Customize Invoice dialog, QuickBooks does the best it can to logically position the fields you choose, but the program can only do so much. To make the invoice look good, it is almost always necessary to adjust the layout in the Layout Designer.
The Layout Designer interface is simple, but it takes some getting used to. Virtually all operations are mouse-driven (click and drag, or drag-and-drop), although you can "nudge" selected items with the arrow keys.
Keep in mind that you can not only change the layout of the invoice elements, but you can modify the display characteristics of individual elements as well. For example, you can change the font, color, alignment, border, and background of any specific field or label.
I recommend that you set the general characteristics you want to use in the Logo & Fonts section of the Basic Customization dialog before you open the Layout Designer. The Layout Designer lets you set the display properties for only one field or label at a time, so you can save yourself some time by only having to modify the exceptions.
To move items around on the invoice, just click and drag the items. You can also click to select an element, and then use the resizing handles to resize it. The columns in the item grid are a little confusing to work with because you get resizing handles for the overall table plus the currently selected column. The solid handles resize the table, and the clear handles resize a column or row.
To change the display characteristics of a label or field, select the element and click the Properties button at the top of the Layout Designer. QuickBooks displays the Properties dialog, which has a Text tab, a Border tab, and a Background tab (see figure 4). These tabs have controls you can use to adjust the way the selected element looks.

Figure 4: Layout Designer Properties Dialog
Setting Margins
One of the first things you should check when you open the Layout Designer is the margin settings. Click the Margins button at the bottom of the Designer to see the current settings.
Most office laser and inkjet printers have a "non-printable" area around the edges of the page. You should check your printer’s documentation to find out how much space you need to allow, and adjust the margin settings in the Designer accordingly.
If any of your invoice elements fall outside the margin guides in the Layout Designer, you should resize or move those elements until everything fits within the printable area.
Positioning and Sizing Your Logo
By default, the Layout Designer places your logo in the return address window alongside your business address (assuming you elected to display your business address on the invoice). If your logo is the right size and you want to use windowed envelopes, the default may work out fine for you. QuickBooks helpfully displays light blue water marks where the windows are positioned on the envelope (see figure 5).
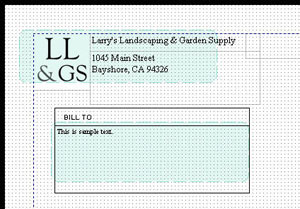
Figure 5: Envelope Windows in the Layout Designer
If you don’t plan to use windowed envelopes, you have a lot of flexibility regarding the size and position of all of your invoice elements. For example, the logo image for my company stretches all the way across the top of the invoice and includes address information. I moved the Invoice label, the date, and the invoice number down below the logo, and I moved the Bill To information to the right side of the page.
As I mentioned earlier, I recommend that you start with a logo image that is the right size for your printed output, rather than trying to stretch it from within the Layout Designer. If your logo comes out looking fuzzy when you print it, you probably need to work with a higher resolution image.
Regardless of how big or small you want your logo to be, here’s a simple formula for calculating the correct image dimensions:
- Figure out where you want to position the image on the invoice, and determine the width and height of the image in inches (use the Layout Designer’s ruler).
- Look up your printer’s resolution, usually expressed in dpi (dots per inch). If you don’t have that information handy, assume 300 dpi.
- Multiply the printer resolution by the width and height in inches to get the width and height in pixels.
For example, if you want your logo to be 4 inches long and 1 inch high when printed, and you have a 300 dpi printer, the image file should be created at 1200 pixels wide (4 x 300) by 300 pixels high (1 x 300). This size will guarantee that your logo looks just as good on the invoice as it does on your monitor.
Using Your Custom Template
After you create your custom invoice, it appears in the template dropdown of the Create Invoices dialog (see figure 6).
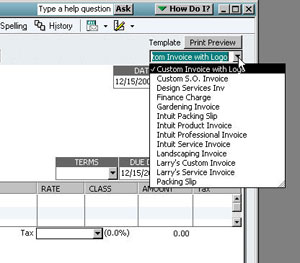
Figure 6: Selecting a Custom Invoice
To use your new invoice, all you have to do is select it from the dropdown. You’ll notice that QuickBooks adjusts the layout of the displayed invoice to show the "Screen" fields you checked when you edited the template with the Customize Invoices dialog.
Fill out your invoice as normal, and then print it. Your printed invoice should look just like your template looked in the Layout Designer, but with the fields filled in of course.
Congratulations! You just created a custom invoice that will impress your customers with its professionalism and clarity.