More and more business owners are discovering the value of having an Internet presence. As users of the Internet themselves, they enjoy having a wealth of information available to them. They are learning that the people and companies who provide this information are often the first to make contact with a potential customer.
The logical next step is to become one of those information providers. Not only does it establish your expertise, but it can give you the first shot at converting a site user to a customer.
Additionally, your site can be an excellent vehicle for delivering important information packets or digital product updates to your existing customers.
Technologies UsedActive Server Pages VBScript FileSystemObject |
However, not all information is meant to be public. You may want to restrict access to some of the information on your site for many reasons. A common reason is that you want to sell digital products through an online store. Or perhaps you want to deliver software updates through your site: Only the customers who purchased the software should be able to get the update. Or maybe you want to make competitive or sensitive information available to only certain users of your site, like your sales force for example.
This article describes techniques you can use to put downloadable files on your Web site, and allow access to only certain users.
Restrict File Access
You can’t easily restrict access to just any file you put onto your Web site. No matter how fancy you get with naming the files, eventually you have to give the URL to somebody, and from that moment on, your security is gone.
The best way to prevent unauthorized access is to take the file off of your Web site entirely. Some people offer the files through FTP instead. However, setting up FTP access requires some degree of system administration expertise and administrative access to the Web server itself. If your site is hosted by someone else, you may not have that access even if you do have the expertise. And FTP certainly doesn’t make sense in the context of an online store.
Another answer is to play the role of the gatekeeper yourself and use email as your delivery mechanism. That answer is a little too manual to be practical. Email is particularly unacceptable with an online store, where instant delivery is part of the purchaser’s expectation.
Okay, so now what? You want to deliver your files through HTTP, but you don’t want the files on the Web site.
Create a File Gateway
The solution is to deliver the files through HTTP, but use a program, not a URL. The program acts as a file gateway: It verifies that the user has the right to download the file, and if so, reads the file from a non-Web folder on the server and transfers it to the client.
The mechanics are fairly simple. This article presents a sample site that demonstrates the techniques you need to use. You can download the entire sample site using the link in the Download the Code side bar of this page.
Here is an overview of the process:
- Establish a location for your protected files.
- Establish a security mechanism to identify authorized users.
- Create a page that validates requests and transfers protected files to authorized requestors through HTTP.
Establish a Folder for Protected Files
The first step is to negotiate a new file organization strategy with your hosting company (or your system administrator). Digital downloads are becoming pretty commonplace, so your hosting company should understand what you are trying to accomplish.
As I mentioned, the key is to get the files off the Web site. You can’t put the files in the root folder of your site or any subfolder of your site. However, by default, most hosting companies only set up access to your site’s top-level folder.
You need to negotiate a new folder structure that is something like this:
FTPRoot
   WebSite
   Downloads
The FTPRoot folder is where you land when you connect to your site through FTP to perform site maintenance. This folder should be one level above your Web site.
The WebSite folder is just what you expect: It contains all of the files and subfolders that make up your Web site. When you configure your site in IIS, this folder is the home directory.
The Downloads folder is where you put your protected download files.
This new structure lets you maintain your Web site and your download files without forcing you to put the download files under your Web site.
Note that, like your WebSite folder, the Downloads folder must allow read access to the system Internet user account (IUSR_MachineName) or whatever account runs anonymous connections to your site. You need to do this because your download page is going to run under that account. If you are using .NET, additional permissions may be required, depending upon the version of IIS you are using and the account that runs your application.
Your host should anticipate this need, but if you have permission errors when you attempt to download files, check the folder permissions. Permissions are one of the first things to consider when you encounter download problems.
Establish a Security Mechanism
The next thing to do is figure out how you will identify the users that are allowed to access download files. Every application has different requirements, but most approaches are variations on some basic models. Here are a couple of common models used on the Internet today.
The Online Store Model
If you have an online store, you need a way to deliver only the files that the customer purchased. Your shopping cart must keep track of which files are associated with which products. You may or may not want to give customers a way to retrieve products at a later date. If you do want to give them that option, you might generate a password they have to use when they return to the site.
The online store model is essentially order-oriented security. Only the person with the correct order number and the password can access the files associated with that order. With this model, it is common to expire the password after a few days or to limit the number of download attempts (or both) in order to reduce the potential loss should your customer share the password with others.
The Repository Model
You may choose the repository model if you have a repository of files that you want to put online, but you want to restrict access to specific users. For example, you might use your Web site as a place where your employees can retrieve confidential company information.
With this model, you often manage access by role. Only persons who have a specific role can access a particular set of files. You normally track the relationship between users and roles and files in a database, and authenticate users through a login page.
The example I’m going to show you in this article is a very simple version of the repository model. By simple, I mean that I’m going to use hard-coded login information instead of a database to control file access. Anyone who knows the login user name and password can access the file repository. It isn’t glamorous, but it is easy to explain.
Create a Download Page
The last step is to create a page that authenticates the user and transfers the requested file. The download page is responsible for reading the file from the download folder into memory and then transmitting the file down to the client browser.
Even though you invoke the download page using a URL, the program won’t initiate the file transfer unless your session has been authorized to access the requested file.
Now that you know the basics, I can demonstrate one approach with an example.
Example Application
Sample CodeRight-click on the link below |
The example is a simple ASP application that protects a folder of text files. I’m working with text files here because it lets me use the FileSystemObject to perform the file I/O. Working with binary files requires a little more effort because you need some kind of component that is capable of reading binary files. I cover that later.
The example application consists of three ASP pages: Login.asp, FileList.asp, and DownloadFile.asp.
Please keep in mind that the purpose of the example is to give you a good understanding of the concepts presented in this article. The techniques used for the application favor simplicity over robustness and scalability. (In other words, don’t rag on me for using the Session object: you always have the option of using a better state mechanism in a production application.)
Login.asp
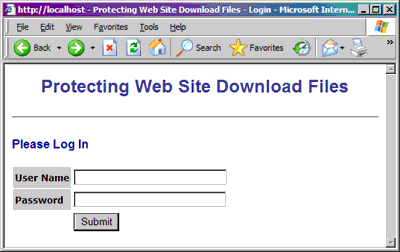
The Login.asp page is a simple authentication gateway that prompts the user for a username and password. If the information is correct, the user is redirected to the FileList.asp page. If validation fails, the user must try again.
The application has no database behind it, so the required user name and password is just hard-coded into the ASP page. Anyone who knows the correct user name and password combination can access the files.

The page defines two procedures: ValidateForm and DisplayForm. When users submit the form, the page executes ValidateForm. If validation is successful, the page redirects to FileList.asp.
Excerpt from Login.asp
Dim mstrUserName, mstrPassword, mstrUserMessage

If Len(Request.Form) > 0 Then
   If ValidateForm() Then
      Response.Redirect("FileList.asp")
   Else
      Call DisplayForm()
   End If
Else
   Call DisplayForm()
End If
The DisplayForm procedure is straightforward. It just displays the login form along with any error message that may have been generated.
The ValidateForm procedure is more interesting because it authenticates the user’s session.
ValidateForm procedure from Login.asp
Function ValidateForm()
   Dim boolContinue

   ' Clear any previous login info.
   Session("Login.UserName") = ""

   ' Get input from the submitted form:
   mstrUserName = Request.Form("txtUserName")
   mstrPassword = Request.Form("txtPassword")

   ' In a real application, you would have a database lookup here or
   ' something else more robust than hard-coded values.
   boolContinue = (LCase(mstrUserName) = "bart")
   If boolContinue Then
      boolContinue = (mstrPassword = "CowaBunga!")
   End If

   If boolContinue Then
      Session("Login.UserName") = mstrUserName
   Else
      mstrUserMessage = "Invalid user name or password. Please try again."
   End If

   ValidateForm = boolContinue
End Function
For simplicity sake, the sample uses a Session variable to hold the login status of the user. For a production application, this approach is not particularly scalable, but it works well enough for the sample.
Each of the “protected” pages on the site, which includes the FileList page and the DownloadFile page, has a small snippet of code at the top to prevent unauthorized use:
Login verification logic
' Redirect to login form if no user name has been written to the session.
If Len(Session("Login.UserName")) = 0 Then
   Response.Redirect("Login.asp")
End If
The authentication process is simple: If the user name has not been set in the session, redirect the request back to the login page.
FileList.asp
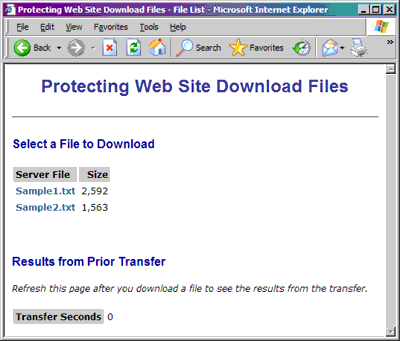
Once you have successfully logged in, you see the FileList.asp page, which lets you select the files you want to download.
The FileList.asp file displays all of the files available for download along with their size. When you click on a file link, you invoke DownloadFile.asp, which is described below.
Note that the link is not a direct URL to the download file because the download file cannot be reached with a URL. The files do not exist in a Web-accessible folder.

Although the links invoke DownloadFile.asp, your browser does not actually navigate away from the FileList.asp page. After the download, you can hit the refresh button to see what happened during the download. The refresh updates the “Results from Prior Transfer” section of the page, which shows you status information captured by DownloadFile.asp.
Rather than hard-coding the file links, FileList.asp builds them dynamically using the FileSystemObject, as shown below:
Dynamically building the list of files with FileSystemObject
<h2>Select a File to Download</h2>
<table border="0" cellspacing="2" cellpadding="3">
   <tr>
      <td class="Label">Server File</td>
      <td class="Label" align="right">Size</td>
   </tr>
<%   Dim objFS, objFolder, objFile

   Set objFS = Server.CreateObject("Scripting.FileSystemObject")
   Set objFolder = objFS.GetFolder(conDownloadFolder)

   For Each objFile In objFolder.Files
%>
   <tr>
      <td><a href="DownloadFile.asp?File=<%= Server.URLEncode(objFile.Name) %>">
      <%= objFile.Name %></a></td>
      <td class="Normal" align="right"><%= FormatNumber(objFile.Size, 0) %></td>
   </tr>
<%   Next
   Set objFile = Nothing
   Set objFolder = Nothing
   Set objFS = Nothing
%>
</table>
FileList.asp fills a 2-column table with file names and file sizes. The first step is to allocate an instance of the FileSystemObject and use it to retrieve information about the download folder. The download folder is identified by a constant (conDownloadFolder) that is declared earlier in the file. Once it retrieves folder information, it gets the file name and size for each file in the folder’s Files collection.
In a real application, you might have additional layers of security at this point. For example, you might restrict the files that are available to each user. This example assumes that if you know the user name and password, you have access to all of the download files.
DownloadFile.asp
The DownloadFile.asp page doesn’t actually display an interface, so your browser does not navigate away from FileList.asp when you perform a download. Instead, it transfers data directly to the browser with special response headers that trigger your browser’s Save As dialog.
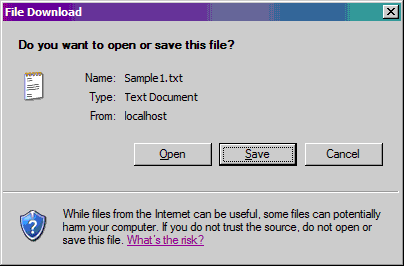
The first thing you typically see is a security dialog that warns you about downloading files. An example from Internet Explorer is shown below.

Note how the browser has already figured out the kind of file you are trying to download. The special headers I mentioned earlier are responsible for passing that information.
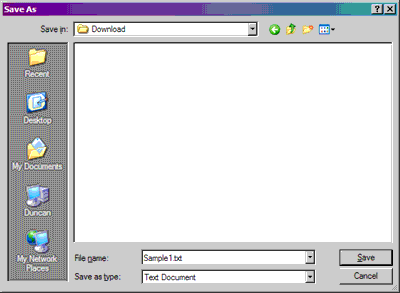
Assuming you clicked Save on the File Download dialog, the next thing you should see is the Save As dialog. This dialog lets you select a location to store the downloaded file.

Once you press Save in the Save As dialog, your browser completes the file transfer and stores the file in the selected location.
Because the whole point of the sample application is to show you how to transfer files, the code in DownloadFile.asp is the most interesting part of the example site.
Transferring a File to the Browser
' Get the name of the requested file and assemble the source path:
strClientFileName = Request.QueryString("File")
strServerFilePath = conDownloadFolder & "" & strClientFileName
' The example assumes all files are text files. You could look at the
' file extension instead and set the MIME content type accordingly.
strMIMEContentType = "text/plain"

' Record the transfer start time:
dtTransferStart = Now()

' Retrieve file contents:
Set objFS = Server.CreateObject("Scripting.FileSystemObject")
Set objStream = objFS.OpenTextFile(strServerFilePath, 1)
strFileData = objStream.ReadAll()
Call objStream.Close()
Set objStream = Nothing
Set objFS = Nothing

' Set response headers:
If Response.Buffer Then
   Call Response.Clear
   Response.Buffer = False
End If
Response.Expires = -100
Response.CacheControl = "no-cache"
Response.ContentType = strMIMEContentType
Call Response.AddHeader("Pragma", "no-cache")
' The Content-Disposition header triggers the browser to display the Save As dialog:
Call Response.AddHeader("Content-Disposition", "attachment; filename=" & _
      strClientFileName)
' Transfer the file to the browser using default code page.
Call Response.Write(strFileData)

' Record the total transfer time in the session:
Session("HttpDownload.TransferSeconds") = DateDiff("s", dtTransferStart, Now())
The FileList page passes the requested file name down to the DownloadFile script through the File query string parameter. DownloadFile assembles a full file path by concatenating the file name to the download folder name, which is again defined with a constant in the file. In a real application, you would get the download folder name from an application configuration file (such as global.asa, or web.config), a database, or an include file.
DownloadFile only works with text files, so it sets the MIME file type to “plain/text.” If you want to work with other file types, you could add logic that figures out the correct MIME file type by looking at the file extension. For example, a .pdf file is expected to be an Adobe Acrobat file, which has a MIME file type of “application/pdf.” The MIME file type tells your browser what kind of file is being passed to it, so it can provide meaningful information in the File Download and Save As dialogs.
Keep in mind that HTML files are just text files, so they work with this example as well. You just have to set the MIME type to “text/html,” which is actually the response default. If you want to secure plain HTML pages, the technique I’m showing you here is one way to do it.
As I mentioned, the DownloadFile page uses the FileSystemObject to read the text file from disk. The ReadAll method reads the entire file into memory, which is fine for small files. If you have large text files, you may want to consider reading the file a line at a time and writing it out to the browser as you go. Your read loop can then use the Response object’s IsClientConnected property and terminate the loop early if the user loses patience and aborts the download before it finishes.
DownloadFile uses the Response object’s Write method to write the text to the browser. This technique generally works fine for plain text files. Bear in mind that the Write method encodes the output using the default code page. Most of the time, you don’t have to worry about this issue. If your download files are encoded with something other than the default code page, you could end up with strange results. If necessary, you can override the default encoding with the CodePage and Charset properties of the Response object.
Note that the client file name and the source file name can be completely different from one another. This capability is handy if you need to give the files an unfriendly name to maintain uniqueness on the server, but you want to give a friendly name to the user. You need a way to map the names to one another, of course, but odds are good that your application will store meta data about your download files in a database. That database would be a great place to maintain the name mapping.
Downloading Binary Files
The example application and the information provided in this article should get you started if all you have to do is download text files. However, many file formats have special control characters in them (beyond the standard carriage return and line feed). They may even consist of unreadable binary data. For example, it is common to offer downloadable zip files and pdf files, particularly if you have an e-commerce site.
Unfortunately, the FileSystemObject does not support binary files. In my opinion, this omission on the part of Microsoft was a mistake. I’m sure there were security concerns about allowing binary file manipulation in a component that was designed for scripting, but in the end, all they did was force people to find a workaround.
Filling the Void
The workaround is to create or buy a component that is capable of reading binary files and writing them to the browser. The component typically writes the file a chunk at a time because the files tend to be large. You could write your own component in Visual Basic using the integrated file IO or with Windows API calls. You use the Response object’s BinaryWrite method to write your chunks to the browser. You use the IsClientConnected property to verify that users haven’t aborted the transfer on their end. The rest of the code looks basically the same as the text transfer logic shown in the example.
Your hosting company may offer access to a file transfer component that you can integrate into your site code, so check with them first. It is much easier to integrate a component that the hosting company already offers than it is to convince them to install one you build or buy.
I recently had to deal with this situation myself. The vendor who developed the shopping cart we use on our e-commerce site offered a “digital download” upgrade. Although they did a fine job of hooking an authentication facility into the cart, they failed to provide a means to perform the actual file transfer. Instead, they recommended that you use a third-party file transfer component that is commonly offered by hosting companies as part of their Windows hosting package.
The LEI HTTP File Transfer Component is Born
Well, we have a dedicated server, which did not have this third-party component installed. When I looked into pricing, I discovered that the vendor charges $150 for a server license. Now, I’m not about to pay $150 for functionality I’ve already produced myself for other projects, so I decided to develop my own binary file transfer component.
I took the approach that I just described with my component. I developed it in Visual Basic. I used the Windows API to open and read the files. If you buy a digital product from the Logical Expressions Store, you are using my HTTP file transfer component to download your purchase.
Conclusion
This article describes how to prevent the unauthorized download of files from your web site. Between the information presented in this article and the free sample site that you can download, you should be able to set up secured downloads on your own site. See the side bar for download instructions.
If you need to support binary files in your secured download scheme, you need a component that supports binary file transfers over HTTP. If your hosting company doesn’t offer a component, you can purchase one, or write one yourself.
