Summary: This article shows you how to send subscribe requests to AWeber directly from your ASP.NET application. This technique is useful when you already have the customer’s name and email address and don’t want a separate subscribe form.
My company uses AWeber to manage our email distribution lists for our newsletters and the registered users for our online conference, the Self-Publishers Online Conference (SPOC). For newsletter subscriptions, we start with the typical AWeber-generated subscribe form. However, we’ve had to tweak those forms to work within the hokey POST-based framework Microsoft devised for ASP.NET. (See my article Embedding Forms in an ASP.NET Web Page for more information about how we did that.)
Key Technologies and Concepts |
|
AWeber Custom Email Parser |
Things got tricky with our online conference. We needed a SPOC News list for anyone who was interested in information about the conference. We also wanted a SPOC Registration list so we could communicate with everyone who actually registered for the conference.
We collected SPOC News subscribers through a standard AWeber subscribe form. But the SPOC Registration list presented a few problems. For one thing, we didn’t want just anyone subscribing to that list. Also, we wanted anyone who registered to be added to the list automatically. The best way to solve both problems was to have the conference software send the subscription request to AWeber directly as part of the registration process.
If you have ever attempted automating AWeber list subscriptions, you know that it can be problematic. Many developers (including me) have tried posting the subscribe form directly to AWeber from the server software, but quickly discover that AWeber rejects form posts that come from the same IP address repeatedly.
Instead, the AWeber-supported solution is to set up an "email parser" on the target list and send subscribe messages via email from the server to the list. That sounds great, except the AWeber email server is picky about the source and format of those incoming messages, and the actual requirements are documented nowhere that I’ve found. Fortunately for you, I’ve already gone through the process of discovering those requirements through trial and error, and I’m happy to share the lessons learned.
Here’s what you need to do to get an AWeber email parser to work with an ASP.NET application:
- Design your subscribe email.
- Create an AWeber list and configure an email parser for it.
- Write the application code.
- Make sure your email server is configured properly.
- Troubleshoot by monitoring the sender email account for bounces.
- Optionally process the subscribe confirmation.
You have two main choices for how you want to pass the subscriber information to your mail parser. You can send the information in the body of the message or you can pass it in custom headers. I’ll show you both approaches in the sections below.
Something to keep in mind is that nothing you do will circumvent AWeber’s double-opt-in policy. Although AWeber does allow your application to automatically subscribe site visitors to a list, AWeber still sends a confirmation message to the subscriber, and the subscriber must click the confirmation link to activate the subscription. I know this frustrates a lot of vendors who have to deal with the inevitable delivery issues when subscribers fail to receive their confirmation messages, or when they just never get around to opening the message or clicking the link. Just remember that the policy protects both you and your customers, and it is one of the main reasons AWeber enjoys a good reputation in the political world of email delivery.
Sending Subscriber Info in a Message Body
The email you send to the AWeber email parser needs to contain, at a minimum, the subscriber’s email address. You can also pass the subscriber’s name, an ad-tracking key, and a "misc" information string.
Designing the Subscribe Email Body
If you want to use the message body to pass subscriber information, I recommend that you keep it simple. No customer will ever see the message, so you might as well make the format easy to parse with regular expressions. One message template I’ve used looks like this:
Name: {FirstName} {LastName}
Email: {EmailAddress}
Activation: {ActivationKey}
Note that the message starts and ends with a blank line, ensuring that a line break precedes the first piece of information and follows the last. I’ll explain the purpose of the Activation field later on. Before the application sends the message, it replaces the curly-bracketed placeholder strings with the actual values it needs to send.
Creating an AWeber Email Parser for the Message Body
Make the list you want to use the active list in the AWeber interface, and then navigate to the Email Parsers page (the link is currently under the My Lists menu item). You could use one of the built-in parsers and design your message to work with it, but setting up a custom message and parser is really no more difficult.
You have a number of choices for how you will "trigger" the parser with incoming messages. You can use information in the subject line or in a header. For example, you could trigger off the sender email address in the From header. I chose to trigger on the subject line.
Once you enter a regular expression for the trigger, you add regular expressions for parsing the subscriber information. That information can also come from a header or the body of the message.
Here’s the parser configuration for the email I designed above:
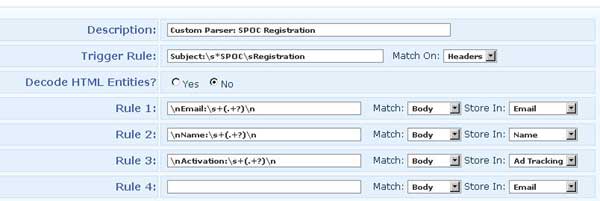
I won’t get into the details of the regular expressions here, but in a nutshell, this configuration says the following:
- Trigger on messages that have a subject header consisting of “SPOC Registration”
- Extract the email address from the body, starting after a newline and the text “Email: “, and ending before the next newline
- Extract the subscriber name from the body, starting after a newline and the text “Name: “, and ending before the next newline
- Extract the Ad Tracking value from the body, starting after a newline and the text “Activation: “, and ending before the next newline
If you want to see other examples of how to set up the regular expressions, just poke around through the various default email parsers that AWeber provides. AWeber uses Perl syntax for its regular expressions.
Once you’ve created it, you can enable and disable the email parser by clicking the checkbox on the email parsers page:

Sending the Message Body from Your Application
You can send email messages in a variety of formats. By default, ASP.NET sends messages with the Content-Type of "text/plain; charset=us-ascii" and a Content-Transfer-Encoding of "quoted-printable". Those defaults worked fine for me, but some developers have apparently had problems with AWeber rejecting messages sent with these defaults. I’ll show you a solution for that in a moment.
For the simple message I designed, all the code needs to do is assemble the message content and send it:
using System.Net.Mail;
using System.Net.Mime;
...
SmtpClient smtp = new SmtpClient(mailServer);
MailMessage msg = new MailMessage(messageSender, messageRecipient);
msg.Subject = subjectLine;
msg.Body = textMessage;
smtp.Send(msg);
The messageRecipient variable contains the email address of the AWeber list server. The address is the name of your list at AWeber.com (e.g. mylistname@aweber.com).
The textMessage variable contains the message template after the placeholders have been replaced with subscriber information. The resulting message goes out looking something like this (many headers omitted for brevity):
MIME-Version: 1.0
From: mysender@mydomain.com
To: mylistname@aweber.com
Subject: SPOC Registration
Content-Type: text/plain; charset=us-ascii
Content-Transfer-Encoding: quoted-printable

=0D=0AName: James Byrd=0D=0AEmail: james@mycompany.com=0D=0A
Activation: 0504d7c6364c4edbbfee=0D=0A=0D=0A
Please note that the line break you see above just before the word Activation is not really in the message. I had to add it so the text would fit within the window without breaking at a more confusing location! In the actual message, all of the body text is on one line.
A trick I’ve used to see exactly what the server is sending is to send the message to my Gmail account instead of to the AWeber list server. You can then use Gmail’s “Show Original” option to see the raw message headers and body. Other email clients offer this feature as well.
You may have noticed that the quoted-printable transfer encoding encodes certain special characters, such as line breaks. That’s what the "=0D=0A" sequences in the message are. This is standard behavior per the SMTP standards for quoted-printable encoding. Every single email client I tested understands that encoding just fine, and I have successfully processed messages with this encoding through my AWeber mail parser.
However, if you have problems, you can suppress the encoding of the line breaks if you send the message with 7-bit transfer encoding. Unfortunately, as of .NET 3.5 anyway, there’s no way to get at the Content-Transfer-Encoding of the default message body.
The trick to solving this problem is to send the plain text message as an "alternate view," because an AlternateView gives you access to the Content-Transfer-Encoding settings. Here’s an example of how you create one:
SmtpClient smtp = new SmtpClient(mailServer);
MailMessage msg = new MailMessage(messageSender, messageRecipient);
msg.Subject = subjectLine;
AlternateView plainView = AlternateView.CreateAlternateViewFromString(
    textMessage, Encoding.GetEncoding("iso-8859-1"), "text/plain");
plainView.TransferEncoding = TransferEncoding.SevenBit;
msg.AlternateViews.Add(plainView);
smtp.Send(msg);
When you create an alternate view, you can use the TransferEncoding property to control the Content-Transfer-Encoding header of the message. If you set it to "SevenBit," .NET will generate your text message without encoding the line breaks. Email messages are commonly encoded with “iso-8859-1” body encoding, so that is what I chose for the AlternateView constructor.
The raw message now comes out looking like this:
MIME-Version: 1.0
From: mysender@mydomain.com
To: mylistname@aweber.com
Subject: SPOC Registration
Content-Type: text/plain; charset=iso-8859-1
Content-Transfer-Encoding: 7bit


Name: James Byrd
Email: james@mycompany.com
Activation: 0504d7c6364c4edbbfee
Note the different Content-Type and Content-Transfer-Encoding headers as well as the lack of encoded line breaks.
Using Headers to Pass Subscriber Information
You can avoid body encoding woes altogether by passing the subscriber information in custom message headers instead of the message body. When naming these custom headers, the standard is to precede them with “X-” which is why you’ll often hear them called "X-headers." Here’s an example:
X-SPOC-Name: {FirstName} {LastName}
X-SPOC-Email: {EmailAddress}
X-SPOC-Activation: {ActivationKey}
The AWeber email parser you create to process your custom headers is very similar to the one you create to process a message body. Here’s the parser that processes the X-headers shown above:

The code to generate the headers is simple:
SmtpClient smtp = new SmtpClient(mailServer);
MailMessage msg = new MailMessage(messageSender, messageRecipient);
msg.Subject = subjectLine;
msg.Body = String.Empty;
msg.Headers.Add("X-SPOC-Email", emailAddress);
msg.Headers.Add("X-SPOC-Name", firstName + " " + lastName);
msg.Headers.Add("X-SPOC-Activation", activationKey);
smtp.Send(msg);
Checking Your Email Server Configuration
AWeber has strict requirements for mail servers that send messages to its lists, so it is unlikely that you will be able to test your application directly from your development machine using a local SMTP server to send the messages.
The primary obstacle is that the sending mail server MUST have a reverse DNS record. For example, if you send messages from mail.mycompany.com with an IP address of 192.168.1.1, AWeber will look for a reverse DNS record that says 192.168.1.1 resolves to mail.mycompany.com.
If reverse DNS is not configured correctly, you’ll get back something like this from AWeber:
Action: failed
Status: 5.5.0
Diagnostic-Code: smtp;550 Could not resolve hostname from 255.255.255.255,
  please contact your ISP to configure a reverse DNS entry before retrying.
AWeber does not appear to reject messages based on SPF rules at this time, but that could change. Your organization should have an SPF record that identifies the valid mail senders for your domain.
Validating and Troubleshooting
If the AWeber list server doesn’t like your message, it will bounce the message back to you. The bounce messages can help you identify message formatting, email parser, and DNS issues.
For example, if you send a bad message format or a message that fails to trigger an email parser, you may get back this smart-ass response from the AWeber email server:
Hi. This is the qmail-send program at mail1.aweber.com.
I'm afraid I wasn't able to deliver your message to the following addresses.
This is a permanent error; I've given up. Sorry it didn't work out.
While this message is monumentally uninformative, you at least get back something indicating an error, so be sure to monitor the sender email account.
If everything goes well, you should be able to find the subscribed email address in AWeber using a subscriber search on the appropriate list. Keep in mind that AWeber always requires a double-opt-in, so your subscriber will still have to confirm the subscription through the link in the email that AWeber sends to them. Consequently, the subscriber will initially display with “Last Follow Up” showing "confirmation" status.
If you are using the same subscriber email address over and over for your testing, you need to confirm the subscription first, and then you can delete the subscriber from the Subscriber Search page.
Processing Subscription Confirmations
If all you need to do is subscribe people to an AWeber list, you are basically done at this point. However, if you need to do something in the application when someone confirms their subscription, then this section will be of interest to you.
For example, we wanted our SPOC registrants to "activate their account" through their AWeber subscription. By confirming their subscription to the SPOC Registrations list, we knew they gave us a valid email address and had not been signed up by someone else. That means we needed a way for the application to receive notification when registrants confirmed their subscription, so we could activate their login for the conference.
Fortunately, AWeber gives you a way to do that.
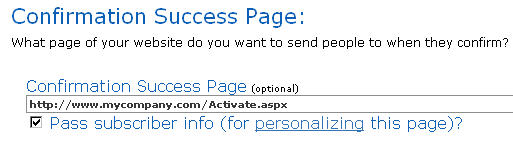
When you set up the list, one of the things you decide is where users are sent when they click the link in the confirmation email. You set up the destination in the AWeber interface on the Confirmed Opt-In page. At the bottom of that page you provide a "Confirmation Success Page" URL. Additionally, you can instruct AWeber to pass the subscriber information on the URL as query string parameters. The purpose of this feature is to allow personalization of the Thank You page, but you can use the information however you want.
In our case, the confirm link takes subscribers back to an "activate registration" page. We peel the query string parameters off the command line and use them to activate the appropriate login. To prevent someone from "gaming the system," we include an "activation key" that must match information stored in the database at the time the account was generated.
Setting up the confirmation page in AWeber is easy. Just enter a URL and click the "Pass subscriber info" check box. AWeber appends the subscriber information to the URL when it redirects the email link to your confirmation page.
The URL you receive looks something like this (line breaks added for clarity):
http://www.mycompany.com/Activate.aspx
?email=james%40mycompany.com
&from=james%40mycompany.com
&meta_adtracking=0504d7c6364c4edbbfee
&meta_message=1
&name=James%20Byrd
&unit=mylistname
&add_notes=255.255.255.255
If you recall from my sample email, I passed our activation key in the message and set up a regular expression to parse it into the "Ad Tracking" field. Here you see the ad tracking value come back to me through the "meta_adtracking" query string parameter. I chose that field because the only other field you have available (other than name and email address) is a "misc" field, and that field does not get passed on the confirmation URL for some reason. One down side to the Ad Tracking field is that it is truncated to 20 characters, but that was enough for my purposes.
When my Activate page receives the parameters from AWeber, it verifies that the email address and activation key match what I have in the database, and then it enables the login for that customer.
Conclusion
It takes a bit of work, but integrating AWeber subscriptions with an ASP.NET application is not impossible. In many ways, AWeber is .NET hostile. Everything I’ve done to integrate AWeber with our Web sites has been huge time sink, but I got ‘er done. I hope that reporting my experiences and the solutions I present here on Nerdy Musings will save you from going through the same pain.
See Also
Here are some links with additional information. Note that they may point to pages that have been moved or deleted since the article was written.
Asp.Net and Aweber by Mark Wiseman
What is an Email Parser? (AWeber knowledge base article)