 When you first acquired that shiny new bread machine, you had visions of homemade bread smells wafting through your home, and you imagined biting into a soft, warm slice of freshly baked bread with butter melting into the top. You couldn’t wait to load up the machine with ingredients and hit the “On” button.
Then you made your first few loaves. The smell was as wonderful as you imagined, but the loaf was a disappointment. Maybe it came out of the machine in a strange shape with a hole in one end. Or maybe it didn’t bake quite right so it wasn’t done in the center. Or maybe the top crust was overdone. In any case, you pushed the machine to a remote corner of your counter and never got around to using it again.
If this sounds like you, take heart. There may yet be a way to salvage your machine and your homemade bread dreams. We’ve learned how to use our bread machine to make excellent bread every time, and we’ve also learned that many other disenchanted bread machine owners have appreciated hearing about how we did it.
Use the Dough Setting
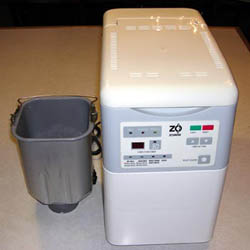
The key to breathing new life into your bread machine is to just use the dough setting. Most bread machines have a setting that lets you stop it when the dough is ready for baking, before the machine begins its bake cycle.
If you have ever tried to make homemade bread by hand, then you know that the most tedious and error-prone part of the process is making the dough. I’ve tried to do it myself a few times and ended up with something more suitable for weighting paper than eating. However, with the assistance of my bread machine, I have been able to turn out excellent loaves of bread for years now.
Of course, you have to take over where the bread machine leaves off, but that part is easy. Once the dough is done, all you have to do is shape it, let it rise for a little while, and bake it. In total, you spend maybe 20 minutes on bread-making activities. In between, you can deal with other things around the house.
One of the coolest aspects of using your bread machine to just make the dough is that your shaping options are unlimited. Sure, you can make a loaf of bread, but you can also make rolls, flutes, baguettes, or pizza. My bread machine makes enough dough for a massive loaf of bread, so I split off part of the dough and make a couple of large side rolls that we typically have with lunch on baking day. I still have plenty of dough left for a standard sandwich loaf.
What You Need to Get Started
Before you get started, be sure you have the equipment and ingredients you need. You don’t need much:
- Oven (duh)
- Non-stick, bread pan (if you are making a loaf)
- Non-stick baking sheet (if you are making rolls or other free-form shapes)
- Ingredients for the bread dough recipe of your choice
- Wire cooling rack (optional)
- Spray oil (optional)
- Fine-ground corn meal in a shaker (optional)
You should also be aware of how much dough your machine makes. Some machines make an over-size loaf, so a sandwich-sized bread pan may not be large enough. If that is the case, you can either reduce the ingredients in your bread dough recipe, or for more fun, plan to make two loaves, or make a single loaf with extras (e.g. rolls, etc.)
For a while I used a bread pan large enough to accept all of the dough from my bread machine, but the huge slices from the loaf were unwieldy. That is when I adopted the smaller-pan-with-side-rolls strategy. I don’t have to adjust my dough recipes, I still get a loaf the size I like, and I get extra goodies. You too may have to experiment to get the results you want.
I mention spray oil and corn meal as optional items. If you have a good-quality non-stick bread pan, you may not need anything to prevent the loaf from sticking to the pan. However, I’ve found that using the oil and corn meal not only makes it easier to get the loaf out of the pan, but it adds a nice, crusty bottom to the bread.
Make the Dough
Once you have everything you need to get started, the first step is to load up your bread machine with the ingredients for a loaf of bread. Feel free to use any recipe you like.
When you turn on the bread machine, be sure to set it on the dough setting. You’ll want to be ready when the dough is done, so you will need to be where you can hear the bread machine’s “done” beep.
Our machine takes slightly over two hours to do its thing. I set a timer for two hours as soon as I turn the machine on, which gives me a few minutes to set up before the dough cycle completes. After I set a timer, I just go on about my work and leave the machine to do what it does best.
Shape the Dough
A few minutes before the dough is ready, or immediately after the bread machine tells you it is ready, set your work area up to shape the dough.
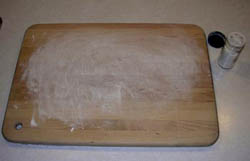
Get out a cutting board and sprinkle it with flour. Smooth the flour out across the surface. It doesn’t take much. You just need enough to keep the dough from sticking to the cutting board. I use a spice jar with a sifter in the top to sprinkle the flour.
If necessary or desired, spray your bread pan and/or baking sheet with spray oil.
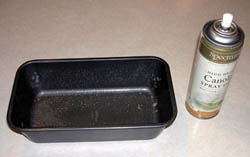
If you like, sprinkle fine-ground corn meal onto the oil as well. Again, I keep some corn meal in a spice jar with a sifter for sprinkling.

I recommend having these setup tasks done before the dough is ready because the bread machine will probably do one last kneading cycle before signaling completion. This last knead compacts the dough so it is easy to remove from the machine. If you let the dough sit in the machine, it will start to rise again.
Set the ball of dough onto the floured cutting board and press it out into a thick circle to remove any air bubbles it may have.
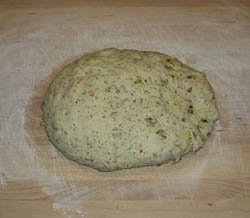
Starting at the edge nearest you, roll and tuck the dough circle into itself to form a long loaf.
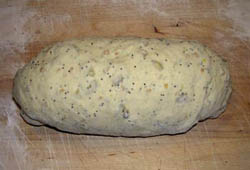
If you are making rolls in addition to a loaf, this is a good point to chop off some of the dough for them. Then tuck in the ends of the loaf to make it a fairly consistent size from end to end.
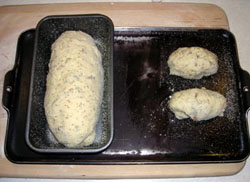
Place your shaped loaf into your bread pan and your shaped rolls onto the baking sheet. Cover both with a clean towel and place them in a warm location to rise.
Bake the Bread
Let the dough rise for about an hour total. Fifteen minutes before the dough is done rising, pre-heat the oven to 350 degrees (Fahrenheit).
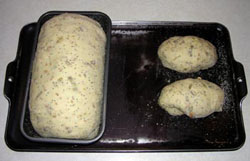
When the dough is ready and the oven is pre-heated, put the bread and rolls into the oven on a middle rack to bake.
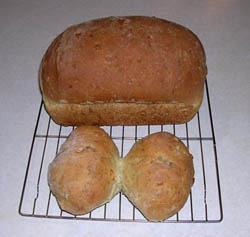
If you are baking rolls, take them out after about 25 minutes, but leave the loaf in the oven for a total of 50 minutes to an hour.
Enjoy the Bounty
When the loaf is done baking, remove it from the baking pan and set it on a wire rack to cool. If you don’t have a cooling rack, you may be able to borrow the rack out of your toaster oven.
Conventional wisdom says that you should not slice the bread until it has cooled for about an hour. We’ve found that an impatient fifteen minutes is all it takes to get a warm “taster” slice off the end, if you have a sharp, serrated knife and you cut very carefully. Few fresh loaves of bread make it into the cabinet fully intact around our house.
Give It a Try
So, what do you think? Are you ready to dust off that bread machine and give it another try?
Now you know that you can let your bread machine do the hard part, and then take over for the easy part that it doesn’t do well anyway. With a little effort and time, you can have those mouth-watering slices of fresh bread you imagined when you first pulled the machine from its packaging.