Back in the early days of the Web, it was fairly common to put a contact link somewhere on your site so your visitors could provide feedback or ask questions. Webmasters often used a widely-supported protocol called "mailto" to invoke the visitor’s email client and initiate a new message with the "to" address (and frequently the subject line) already filled in.
These "mailto links" worked nicely until online privacy became a thing of the past. Spammers have long since perfected automated page crawlers (often called spambots) that go around the Internet collecting email addresses from these easily identified mailto links. Today, putting your email address in a mailto link is just asking for an endless stream of junk email.
However, mailto links satisfy a genuine business requirement: your customers need a way to get in contact with you. So what do you do? One solution is to create a form on your Web site contact page that accepts your visitor’s comments and submits that information to you via email.
So how does this form differ from a mailto link? The main benefit is that you can hide your email address in the code in the server that assembles and submits the email. Spambots can’t get at this code, so they can’t harvest the information.
Are there limitations to this approach? Yes, but usually the benefits far outweigh the costs.
How Does It Work?
The basic elements of a contact page include an HTML form to accept input, a server-side script to assemble and send the email message, and often a thank you page to let your visitor know that their submission was accepted.
In this article, I explain each of these elements in detail. You can also download the sample code for the examples. The sample code runs on most Windows-based Web servers, and you are welcome to modify it for your own use.
Figure 1 shows an overview of the process. The visitor navigates to your contact page and enters information into the fields in an HTML form. The visitor clicks the submit button, which sends the form to the message script. The message script assembles an email message and sends it to the address you specify. The message script then redirects the visitor to the Thank You page.
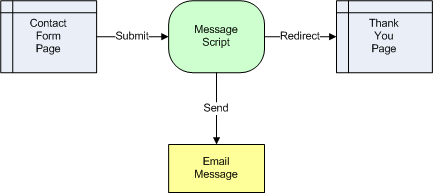
Figure 1. How the process works.
Visitors don’t see any of the work being done by the message script, of course. From their perspective, they go straight from the contact form to the thank you page.
The Contact Form
The first step in the process is the contact form. The purpose of the contact form is to collect information from the visitor. One major advantage of using a contact form over a free-format email message is that you can ask your visitors for specific information that will help you serve them better.
Figure 2 shows a screen shot of a simple contact form. I used a few different types of form controls, such as radio buttons and check boxes to show you how you can prompt your visitors for specific pieces of information.
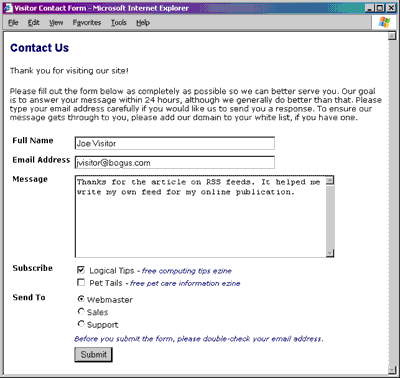
Figure 2. A Sample Contact Form.
You can see right away that this form gives you certain advantages over a mailto link, if your visitor is willing to fill it out completely. For example, you can give the visitor the opportunity to subscribe to your e-zine. You can also use the form to direct the message to the most appropriate inbox.
Although the form lists Webmaster, Sales, and Support as send-to options, the actual name of the email addresses they go to could be something completely different. Spammers know that most organizations have email accounts with those names (like sales@mycompany.com), so they’re probably already trying to send their junk to those names at every domain they find on the Internet. To combat this rudeness, you can give your actual e-mail accounts more obscure names, and use your contact form to give your customers access to those accounts.
Unfortunately, even a Web form is not enough to completely avoid junk messages. Some cretins have even gone so far as to write programs that can fill out forms and submit them. It isn’t as hard as it sounds. You usually just get nuisance messages this way (not spam), but it is definitely irritating.
If your form starts to attract this type of unwanted use, you can resort to adding a CAPTCHA field to your form. CAPTCHA is an acronym for Completely Automated Public Turing test to tell Computers and Humans Apart. You may have encountered it as a security measure on certain Web sites. The idea is that you display a graphic image with a code in it. The image obscures the code so it is hard for computers to read, but relatively easy for humans to read. The visitor has to enter the code that the image displays into an input field. If the value in the image and the value in the field don’t match, the Web site rejects the submission.
Using CAPTCHA is beyond the scope of this article, but there’s plenty of information available on the Internet about it if you want to learn more.
The Message Script
When your visitor clicks the submit button on your contact form, your browser posts the information in the form back to a message script on the server. In my case, the message script is an Active Server Page written in VBScript called Contact.asp. The script assembles the incoming form data into an email message and sends it to the email address indicated by the form.
The code is not complicated. It performs these primary tasks:
- Extract the values for each field out of the form.
- Assemble an email message that includes all the data from the form along with labels to identify each value.
- Send the message using JMail.
- Redirect the visitor to either a thank you page or an error page.
I’ll go over the details of the script here in chunks. If you want to see the full source code for the message script, download the sample files using the link at the bottom of this article.
As I mentioned before, the contact form lets visitors choose a destination for their message. They use a radio button to select from webmaster, sales, and support. The input tags for this part of the form look like this:
<input type="radio" name="SendTo" value="w" checked>Webmaster<br>
<input type="radio" name="SendTo" value="s">Sales<br>
<input type="radio" name="SendTo" value="t">Support</td>
Each radio button has the same name, which is what makes them mutually exclusive. The webmaster option is "checked" (i.e., selected) by default. Note that the options use a code for their value (w, s, and t), not an email address that could potentially be harvested. Instead, the script (which cannot be seen by crawlers) maps the selected value to an email address as follows:
Select Case Request.Form("SendTo")
   Case "s": strRecipient = "fred@bogus.com"
   Case "t": strRecipient = "wilma@bogus.com"
   Case Else strRecipient = "dino@bogus.com"
End Select
Next, the script collects the values from all the other form controls and concatenates them together with labels that describe them:
strMsg = "Full Name: " & Request.Form("FullName") & vbCrLf
strMsg = strMsg & "Email Address: " & Request.Form("EmailAddress") & vbCrLf
strMsg = strMsg & "Subscribe to Logical Tips: " _
& CheckBoxToYesNo(Request.Form("LogicalTips")) & vbCrLf
strMsg = strMsg & "Subscribe to Pet Tails: " _
& CheckBoxToYesNo(Request.Form("PetTails")) & vbCrLf
strMsg = strMsg & "Message: " & vbCrLf & Request.Form("MessageText") & vbCrLf
The CheckBoxToYesNo function deals with the fact that checkboxes don’t pass any value on to the script if they aren’t checked, and they usually pass the value "on" when they are checked. Those values aren’t very useful to the person receiving the email, so the CheckBoxToYesNo function converts them to a simple Yes or No.
The email generated by this code looks something like this:
Full Name: Joe Visitor
Email Address: jvisitor@bogus.com
Subscribe to Logical Tips: Yes
Subscribe to Pet Tails: No
Message:
Thanks for the article on RSS feeds.
It helped me write my own feed for my online publication.
Each value has a label that identifies it. I put the message text at the bottom on a new line because it could be long.
To send the message, the script uses CDONTS, which is available on most Windows servers. The script creates a CDONTS.NewMail object, sets the appropriate properties, and executes the send method:
Sub SendWithCDONTS(strRecipient, strMsg, strStatus)
   Dim objMail

   Set objMail = Server.CreateObject("CDONTS.NewMail")
   objMail.From = "contact@bogus.com"
   objMail.To = strRecipient
   objMail.Subject = "Site Visitor Contact Message"
   objMail.Body = strMsg
   On Error Resume Next
   objMail.Send
   If Err.number <> 0 Then
      strStatus = "Attempt to send message failed: " & Err.Description
      Err.Clear
   End If
   On Error GoTo 0
   Set objMail = Nothing
End Sub
You can use any valid email address in your domain as the From property. To set the recipient address, the script set the To property to the value of the strRecipient variable. The strRecipient variable contains the email address assigned by the script in the select statement that I described earlier.
If everything goes well, the Send method executes without raising an error. If something goes wrong, the script traps the error and stores the description of the error in the strStatus variable.
The code I just showed you could just have easily been written using another email sender like JMail. In fact, the sample script includes procedures for both. If you prefer to use JMail, just comment-out the call to SendWithCDONTS and uncomment the SendWithJMail call. You can get JMail for free from www.dimac.com.
Finally, the script displays the thank you page if the email was sent successfully or the error page if the send failed:
If len(strStatus) = 0 Then
Response.Redirect("ContactThankYou.htm")
End If
To display the thank you page, the script redirects the user to an HTML file. To display the error page, the script falls through to the HTML that is coded into the bottom of the page.
The Error Page
Visitors get the error page (see Figure 3) if anything goes wrong during the email sending process. Errors can happen for any number of reasons, from a logic error in the code to a communication failure at the mail server.
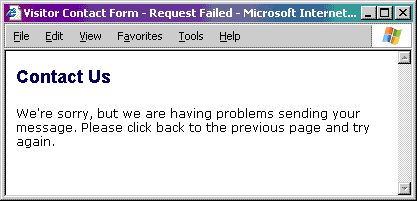
Figure 3. The error page.
In general, nasty or cryptic error messages have no meaning for users. Many times, just hitting the Back key and trying again will get them past the problem, so the error page instructs them to do that. If you want to hear from your visitors when they are having problems, you might consider putting a phone number on the error page so they can report problems directly to you.
The Thank You Page
Visitors see the thank you page when Contact.asp determines that everything went well. Figure 4 shows the thank you page.
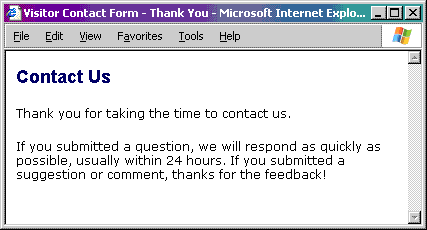
Figure 4. The Thank You page.
Go Forth and Contact
When you publish your contact information on your Web site, you do it to help your visitors, not to offer it up to unscrupulous spammers. If you are tired of receiving spam in trade for your good faith, try using a contact form like the one described in this article to hide your email address. At the same time, you can prompt your customers for the information you really need in order to help them effectively.
If you would like to see the full source code for this article, you can download it for free using the link below. Happy coding!